This tutorial explains how to provision a set of EC2 instances on AWS and deploy a Kubernetes cluster using Kubespray. To save time, we will use Terraform (an open-source tool for provisioning cloud and on-premise infrastructure) for the first section. Then, we will walk through how to use Kubespray to deploy a Kubernetes cluster using EC2 instances.
Before we start, ensure you have the following tools installed:
Requirements
Download the Kubespray GitHub repository and check out the latest version. At the time of writing, we are using 2.19. Kubespray is under constant development, and you can run into problems if you don’t use a stable release.
$ git clone git@github.com:Kubernetes-sigs/Kubespray.git

$ cd Kubespray

$ git checkout release-2.19
Let’s install the required Python dependencies using pip
$ pip3 install -r ./requirements.txt
Infrastructure
Next, we’re going to use the Terraform template provided in the Kubespray repository to deploy a set of AWS EC2 instances. After that, we should have a cluster of EC2 instances configured as pictured below.
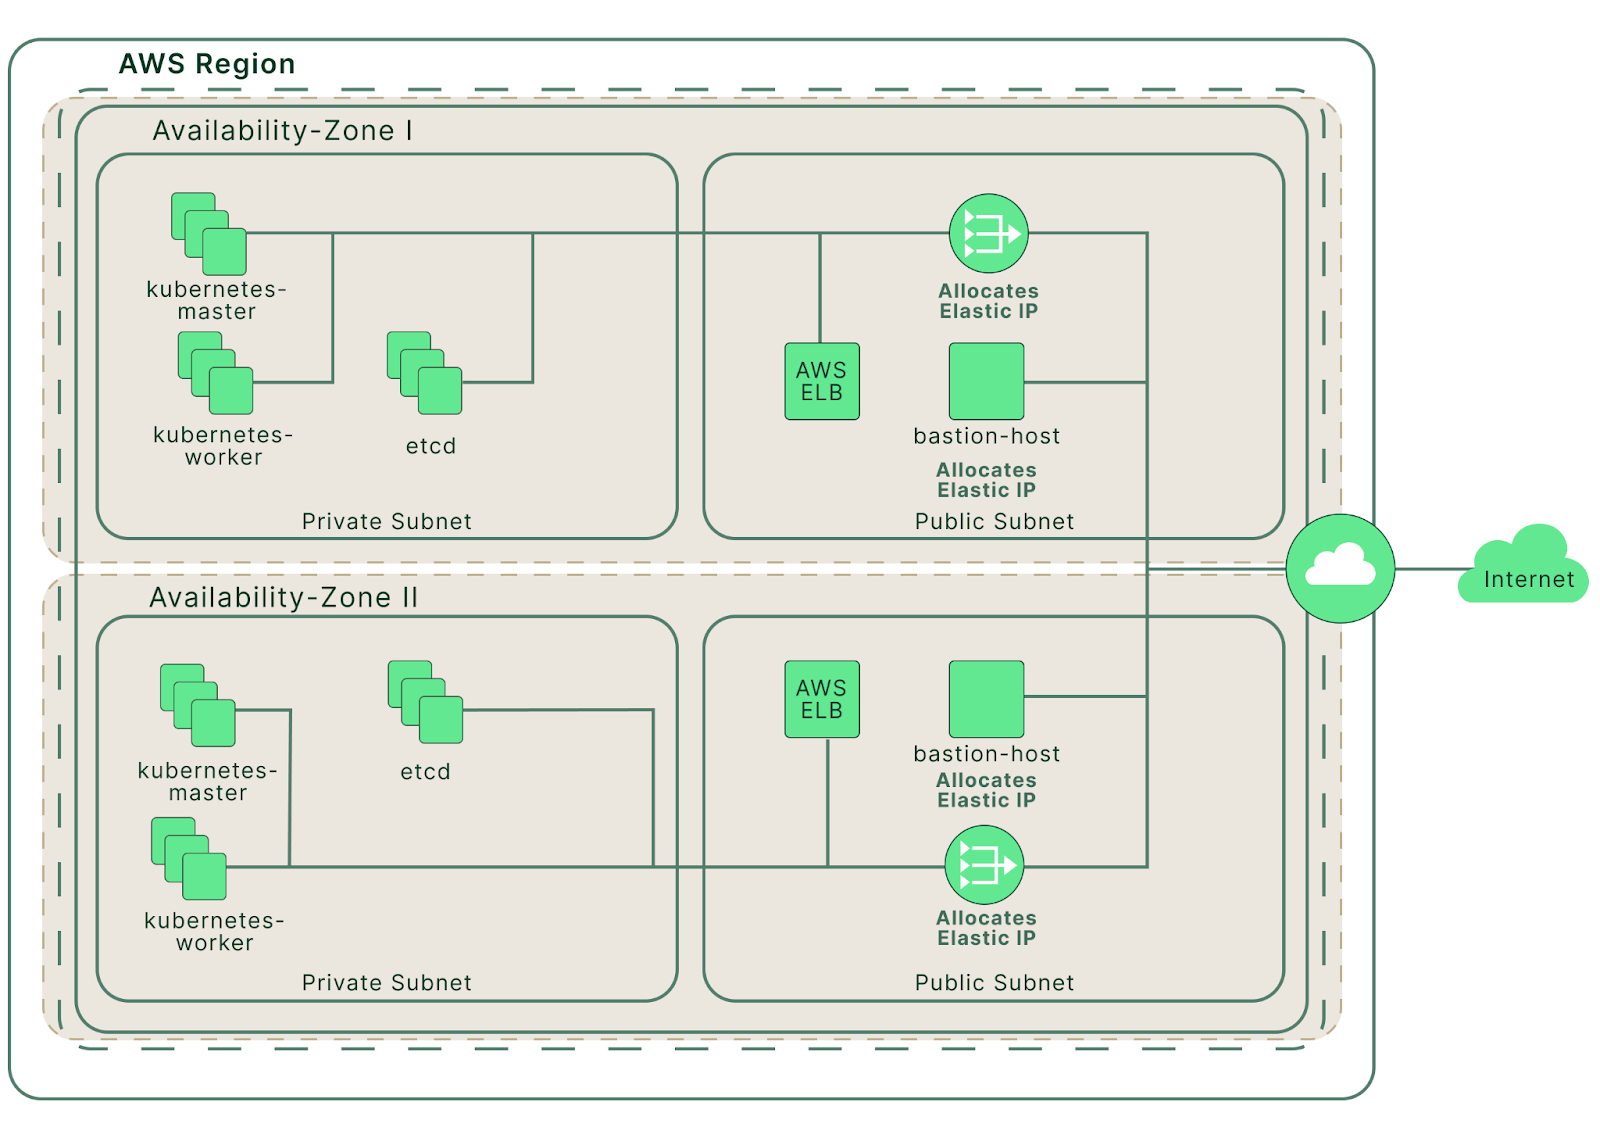
The AWS cloud infrastructure created by Terraform (source)
In the Kubespray repository, navigate to the AWS terraform directory.
$ cd contrib/terraform/aws
Run Terraform initialization to download the dependencies.
$ terraform init

Initializing modules...

Initializing the backend...

Initializing provider plugins...
- Reusing previous version of hashicorp/template from the dependency lock file
- Reusing previous version of hashicorp/null from the dependency lock file
- Reusing previous version of hashicorp/aws from the dependency lock file
- Using previously-installed hashicorp/template v2.2.0
- Using previously-installed hashicorp/null v3.1.1
- Using previously-installed hashicorp/aws v4.22.0

Terraform has been successfully initialized!

You may now begin working with Terraform. Try running "terraform plan" to see
any changes that are required for your infrastructure. All Terraform commands
should now work.

If you ever set or change modules or backend configuration for Terraform,
rerun this command to reinitialize your working directory. If you forget, other
commands will detect it and remind you to do so if necessary.
Set AWS credentials for Terraform to be able to interact with your AWS account.
export TF_VAR_AWS_ACCESS_KEY_ID="<YOUR_ACCESS_KEY_HERE>"
export TF_VAR_AWS_SECRET_ACCESS_KEY="<YOUR_SECRET_KEY_HERE>"
export TF_VAR_AWS_DEFAULT_REGION="us-west-2" # Or any other AWS region
If you don’t have an AWS EC2 key pair, create one by following this guide before proceeding. We will use this key pair later to allow Kubespray to connect to our EC2 instances. We have already created and downloaded a key pair called cluster-1.
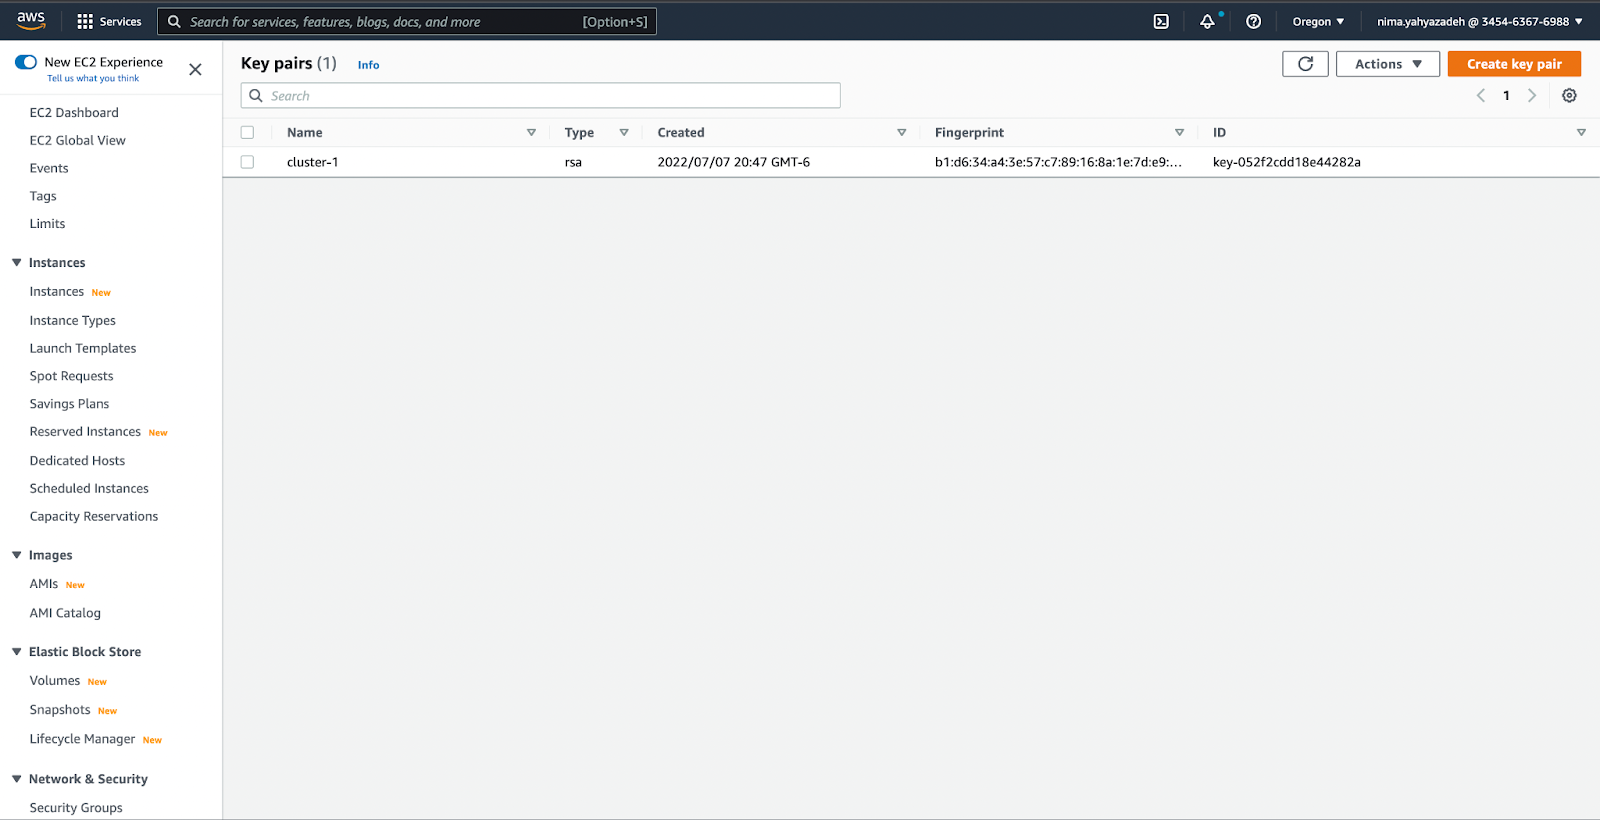
The “cluster-1” EC2 key pair used for SSH access to EC2 instances
Set the following variable for Terraform to use your keypair.
$ export TF_VAR_AWS_SSH_KEY_NAME="cluster-1"
During this tutorial, you may experience connectivity issues to either the Bastion instance or any of the EC2 instances. In that case, you can try to add the EC2 key pair to your SSH Agent using the following commands.
$ eval $(ssh-agent)

$ ssh-add <PATH_TO_YOUR_KEY_PAIR_PEM>
Next, we will use Terraform to create our instances and other resources. The ‘apply’ command will kick off the creation process, but you could also use the ‘plan’ command to view an execution plan before applying it. If everything is set up correctly, Terraform will create the resources within minutes.
$ terraform apply

# or

$ terraform plan -out cluster-1.plan
$ terraform apply cluster-1.plan

.
.
.

Apply complete! Resources: 42 added, 0 changed, 0 destroyed.

Outputs:

aws_nlb_api_fqdn = "kubernetes-nlb-cluster-1-9380bb7099c714a4.elb.us-west-2.amazonaws.com:6443"
bastion_ip = "35.89.103.85"
default_tags = tomap({})
etcd = <<EOT
      10.250.193.75
      10.250.212.67
      10.250.198.201
      EOT
      inventory = <<EOT
      [all]
      ip-10-250-193-75.us-west-2.compute.internal ansible_host=10.250.193.75
      ip-10-250-212-67.us-west-2.compute.internal ansible_host=10.250.212.67
      ip-10-250-198-201.us-west-2.compute.internal ansible_host=10.250.198.201
      ip-10-250-203-209.us-west-2.compute.internal ansible_host=10.250.203.209
      ip-10-250-221-239.us-west-2.compute.internal ansible_host=10.250.221.239
      ip-10-250-196-81.us-west-2.compute.internal ansible_host=10.250.196.81
      ip-10-250-223-226.us-west-2.compute.internal ansible_host=10.250.223.226

      bastion ansible_host=35.89.103.85

      [bastion]
      bastion ansible_host=35.89.103.85

      [kube_control_plane]
      ip-10-250-193-75.us-west-2.compute.internal
      ip-10-250-212-67.us-west-2.compute.internal
      ip-10-250-198-201.us-west-2.compute.internal

      [kube_node]
      ip-10-250-203-209.us-west-2.compute.internal
      ip-10-250-221-239.us-west-2.compute.internal
      ip-10-250-196-81.us-west-2.compute.internal
      ip-10-250-223-226.us-west-2.compute.internal

      [etcd]
      ip-10-250-193-75.us-west-2.compute.internal
      ip-10-250-212-67.us-west-2.compute.internal
      ip-10-250-198-201.us-west-2.compute.internal

      [calico_rr]

      [k8s_cluster:children]
      kube_node
      kube_control_plane
      calico_rr

      [k8s_cluster:vars]
      apiserver_loadbalancer_domain_name="kubernetes-nlb-cluster-1-9380bb7099c714a4.elb.us-west-2.amazonaws.com"

      EOT
      masters = <<EOT
      10.250.193.75
      10.250.212.67
      10.250.198.201
      EOT
      workers = <<EOT
      10.250.203.209
      10.250.221.239
      10.250.196.81
      10.250.223.226
      EOT
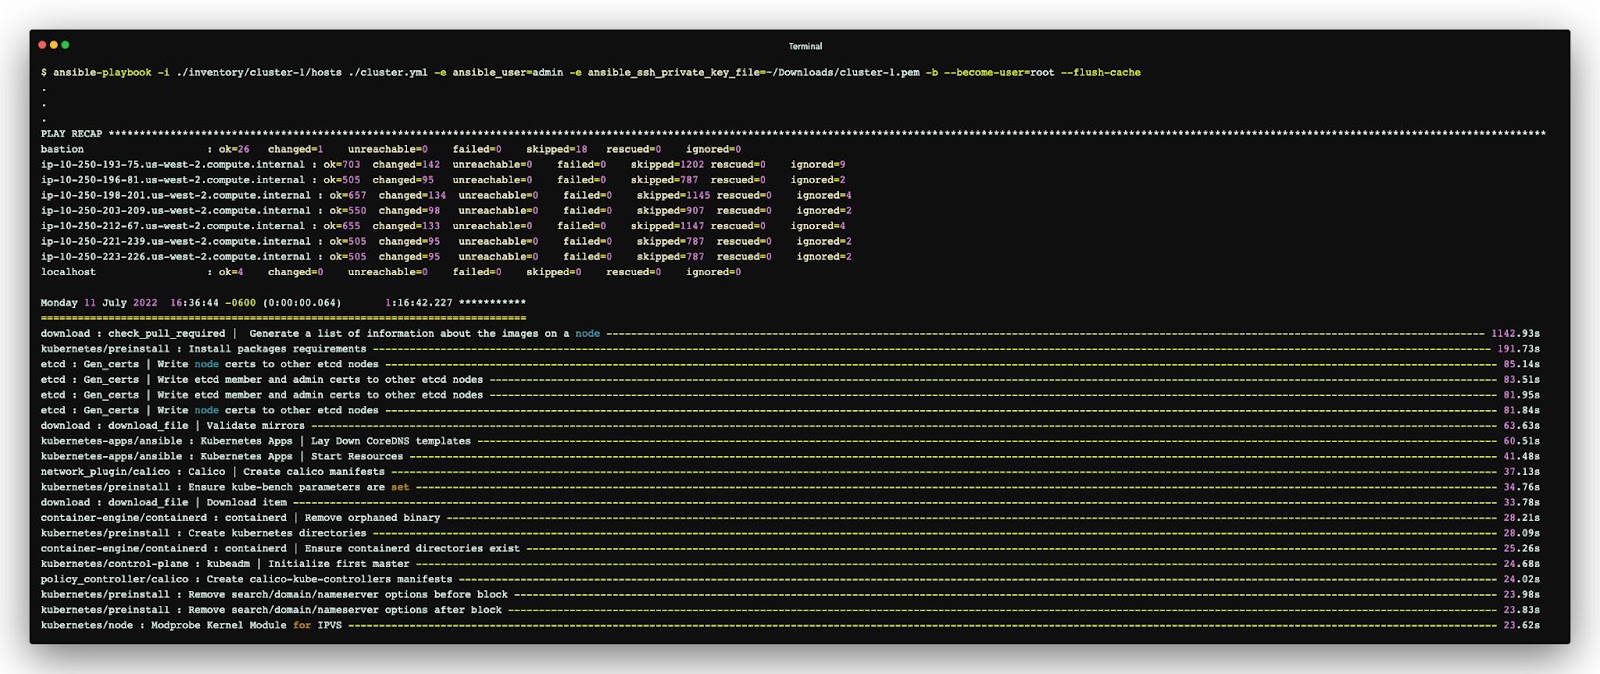
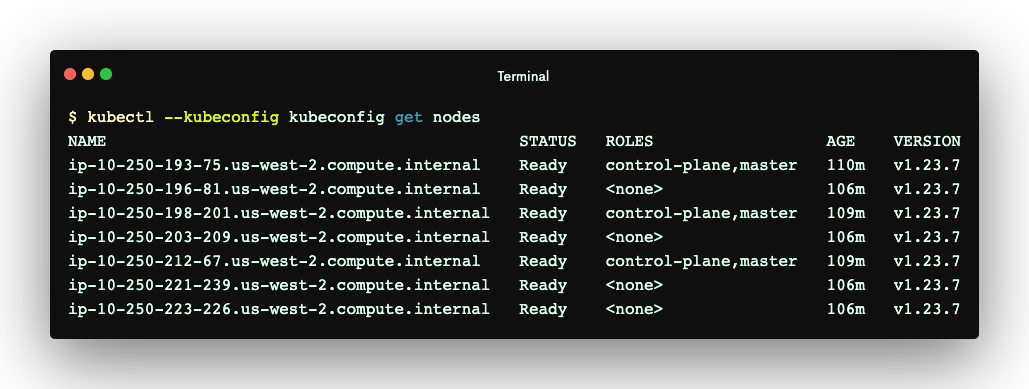
The output above shows the resources created by Terraform. It also creates an inventory/hosts file, which Kubespray and Ansible use to manage the nodes and their Kubernetes roles. Later, we’ll use it to install some essential components into the nodes. See the Ansible documentation to learn more about the use cases and syntax of the inventory file. The code block below shows the content of the inventory/hosts file generated for this tutorial. Its content will be referenced throughout the post.
[all]
ip-10-250-193-75.us-west-2.compute.internal ansible_host=10.250.193.75
ip-10-250-212-67.us-west-2.compute.internal ansible_host=10.250.212.67
ip-10-250-198-201.us-west-2.compute.internal ansible_host=10.250.198.201
ip-10-250-203-20[9.us-west-2.compute.internal ansible_host=10.250.203.209
ip-10-250-221-239.us-west-2.compute.internal ansible_host=10.250.221.239
ip-10-250-196-81.us-west-2.compute.internal ansible_host=10.250.196.81
ip-10-250-223-226.us-west-2.compute.internal ansible_host=10.250.223.226

bastion ansible_host=35.89.103.85

[bastion]
bastion ansible_host=35.89.103.85

[kube_control_plane]
ip-10-250-193-75.us-west-2.compute.internal
ip-10-250-212-67.us-west-2.compute.internal
ip-10-250-198-201.us-west-2.compute.internal

[kube_node]
ip-10-250-203-209.us-west-2.compute.internal
ip-10-250-221-239.us-west-2.compute.internal
ip-10-250-196-81.us-west-2.compute.internal
ip-10-250-223-226.us-west-2.compute.internal

[etcd]
ip-10-250-193-75.us-west-2.compute.internal
ip-10-250-212-67.us-west-2.compute.internal
ip-10-250-198-201.us-west-2.compute.internal

[calico_rr]

[k8s_cluster:children]
kube_node
kube_control_plane
calico_rr

[k8s_cluster:vars]
apiserver_loadbalancer_domain_name="kubernetes-nlb-cluster-1-9380bb7099c714a4.elb.us-west-2.amazonaws.com"
As you can see, this file lists all the EC2 instances and their role in the cluster. For example, the content above shows that we will install the Kube control components and etcd into ip-10-250-193-75.us-west-2.compute.internal.