Learn how to deploy, scale, and manage containerized applications in a multi-cloud environment with Kubernetes, including key concepts and best practices.
🎉 Kubecost 2.0 is here! Learn more about the massive new feature additions and predictive learning

Kubernetes Load Balancer: Tutorial & Examples

Kubernetes is an open-source system for automating containerized application deployment, scaling, and management. It is a cloud-native solution intended for deployment across multiple cloud providers. With Kubernetes, enterprises can use any cloud provider.

Multi-cloud Kubernetes clusters help to ensure scalability, availability, and redundancy for applications running on both cloud environments. Kubernetes load balancing plays a significant role in ensuring the effectiveness of multi-cloud Kubernetes clusters. By distributing traffic between the various nodes of the cluster, load balancers provide both performance and reliable service by balancing out any bottlenecks that may arise from using multiple cloud providers.

But how do you load balance traffic among clusters hosted by several cloud service providers? This article examines Kubernetes load balancer options and provides a practical example of how to load balance between clusters deployed in a multi-cloud environment (AWS and GCP).

Summary of key Kubernetes load balancer concepts

The table below summarizes the Kubernetes load balancer and multi-cloud concepts we will review in this article.

Concept Summary
Kubernetes service types The key service types are:
  • ClusterIP
  • NodePort
  • LoadBalancer
  • ExternalName
  • Headless
Kubernetes multi-cluster deployments A multi-cluster deployment spans different cloud providers and/or on-premise environments. Benefits of multi-cluster deployments include:
  • More control over data
  • Pricing flexibility
  • Scalability
  • Redundancy
Connect multi-clusters across regions/ clouds Connecting multi-clusters across regions or clouds involves:
  • Kubernetes Federation
  • Implement Kubernetes Federation to connect multiple Kubernetes Clusters
Manage multi-cluster traffic using DNS Multi-cluster DNS traffic is configured and managed using:
  • Cross-cluster networking
  • Implementation of traffic management using a DNS Service
Kubernetes multi-cloud and multi-region best practices Key best practices include using:
  • Kubecost for cost optimization
  • ArgoCD for GitOps
  • Prometheus Thanos for monitoring

Kubernetes service types

Kubernetes provides various services to access applications running on clusters of virtual machines from outside the cluster. These services are ClusterIP, NodePort, Load Balancer, ExternalName, and Headless service.

  • ClusterIP: This is the default service type. It exposes the service on a cluster-internal IP, which is only reachable within the cluster. It is not accessible from outside the cluster.
  • NodePort: This type exposes the service on each Node's IP at a static port (the NodePort). You can access the Service from outside the cluster using <NodeIP>:<NodePort>.
  • LoadBalancer: This type exposes the service externally using a cloud provider's load balancer. The load balancer distributes incoming requests to multiple nodes in a cluster, allowing for better scalability and performance.
  • ExternalName: This type maps the service to an external DNS name. ExternalName service is helpful when you want to access a Service that is not running in your Kubernetes cluster or when you want to access a Service by a DNS name that is different from its Service name.
  • Headless: This type is similar to a ClusterIP Service but does not create a virtual IP for the service. Instead, it assigns each Pod in the service a unique IP within the cluster. Headless service is helpful when accessing the Pods directly rather than through a load balancer or proxy.

Kubernetes multi-cluster deployments

At its core, a Kubernetes cluster is a group of nodes (or "machines") that work together as part of an orchestration system. Each node runs an open-source container orchestration platform instance, allowing it to deploy and manage application containers in a distributed environment.

Segmentation and replication are two types of Kubernetes multi-cluster deployments.

  • Segmentation divides multiple clusters into individual parts or segments so that applications can be deployed independently in each segment. This allows teams to manage their application deployments more efficiently while maintaining control over their infrastructure.
  • Replication is a way of distributing an existing application across multiple Kubernetes clusters. Replication ensures high availability and scalability of the application by allowing rapid deployment when needed.

Both replication and segmentation provide great flexibility when deploying Kubernetes applications across different cloud platforms.

A multi-cluster deployment is when you create multiple clusters that span different cloud providers and on-premise environments. This means that instead of having all your resources in one place — such as on one cloud provider or data center — you have them spread out over multiple locations, giving you more control over how your applications are deployed and managed.

Multi-cluster deployments have several advantages, including:

  • More control over your data. Multi-cluster deployments give you more control over where your data lives, allowing you to spread out your resources to maximize scalability and performance.
  • Pricing flexibility. Multi-cluster deployments help you to take advantage of different pricing models from various cloud providers or reduce costs by using on-premise hardware instead of relying solely on the public cloud for your computing needs.
  • Scalability. Multi-cluster deployments allow you to expand quickly or contract business needs without completely rebuilding your infrastructure whenever an adjustment is required.
  • Redundancy. Multi-cluster deployments provide better redundancy since having multiple clusters means there’s less risk that an entire system will go down due to a single failure point, such as an outage in one region or provider.

Comprehensive Kubernetes cost monitoring & optimization

How to use Kubernetes load balancing for a multi-cloud deployment on AWS and GCP

The tutorial below will deploy a multi-cloud Kubernetes cluster in Amazon Web Services (AWS) and Google Cloud Platform (GCP).

Deployment architecture

Below is an overview of the architecture we will use in our tutorial.

An overview of Kubernetes load balancing in a multi-cloud (AWS and GCP) environment.

  • Master Kubernetes Cluster
    • To manage multi-cloud Kubernetes clusters, we will deploy a federated cluster architecture.
    • Federated cluster architecture provides methods to manage multiple Kubernetes clusters from a single master cluster.
    • The master cluster can run locally or in the cloud. In this example, we will deploy the master cluster in AWS EKS.
  • Multi-cloud Clusters
    • AWS EKS (us-east-1)
    • GCP GKE (europe-west1)
  • DNS
    • To manage the traffic to clusters we will use AWS Route53.
    • Traffic management can be done in various ways. We will explore more options in the tutorial.

Prerequisites

Before you get started, make sure you have these prerequisites.

Deploy Kubernetes clusters across AWS and GCP

To deploy the Kubernetes clusters in AWS and GCP, we will use Terraform.

First, create a file named versions.tf with the below code block.

# Terraform Block
terraform {
  required_version = "~> 1.1.7"
  required_providers {
    aws = {
      source  = "hashicorp/aws"
      version = "~> 4.0"
    }
    google = {
      source  = "hashicorp/google"
      version = "~> 4.0"
    }
  }
}

# Provider Block
provider "aws" {
  region = "us-east-1"
}

provider "google" {
  credentials = file("./gcp-creds.json")
  project     = "abhidevops-348717"
  region      = "europe-west1"
}

This file defines providers, versions, and authentication for AWS and GCP. Notice the region for AWS and GCP are different as per deployment architecture. Credentials for GCP are stored in the file gcp-creds.json.

For GCP, the project name and credentials file might be different in your case. Update those parameters accordingly.

Next, create a file named main.tf with the below code block.

locals {
  common_tags = {
    ManagedBy   = "Terraform"
  }
}

This file defines common tags that Terraform will apply to cloud resources created.

To define commonly used variables, create a file called variables.tf.

variable "gcp_project_id" {
  default = "abhidevops-348717"
}

Here we define a variable gcp_project_id that will be the GCP project ID.

Next, to deploy the underlying network resources for AWS EKS clusters, create a file named aws-vpc.tf.

module "aws_vpc" {
  source = "terraform-aws-modules/vpc/aws"
  version = "3.18.1"

  name = "k8s-aws-gcp"
  cidr = "10.0.0.0/16"

  azs             = ["us-east-1a", "us-east-1b", "us-east-1c"]
  private_subnets = ["10.0.1.0/24", "10.0.2.0/24", "10.0.3.0/24"]
  public_subnets  = ["10.0.101.0/24", "10.0.102.0/24", "10.0.103.0/24"]

  enable_nat_gateway = false
  enable_vpn_gateway = false

  tags = local.common_tags
}

This file defines a Terraform module to deploy and configure AWS VPC for EKS clusters.

Next, to deploy our master and federated cluster in EKS, create a file called aws-eks.tf.

module "aws_master_eks" {
  source  = "terraform-aws-modules/eks/aws"
  version = "~> 19.0"

  cluster_name    = "master-cluster"
  cluster_version = "1.24"

  cluster_endpoint_public_access  = true

  cluster_addons = {
    coredns = {
      most_recent = true
    }
    kube-proxy = {
      most_recent = true
    }
    vpc-cni = {
      most_recent = true
    }
  }

  vpc_id                   = module.aws_vpc.vpc_id
  subnet_ids               = module.aws_vpc.public_subnets

  # EKS Managed Node Group(s)
  eks_managed_node_group_defaults = {
    instance_types = ["t3.small", "t3.medium", "t3.large", "t2.small"]
  }

  eks_managed_node_groups = {
    green = {
      min_size     = 1
      max_size     = 1
      desired_size = 1

      instance_types = ["t3.small"]
      capacity_type  = "SPOT"
    }
  }

  tags = local.common_tags
}

module "aws_federated_eks" {
  source  = "terraform-aws-modules/eks/aws"
  version = "~> 19.0"

  cluster_name    = "aws-federated-cluster-a"
  cluster_version = "1.24"

  cluster_endpoint_public_access  = true

  cluster_addons = {
    coredns = {
      most_recent = true
    }
    kube-proxy = {
      most_recent = true
    }
    vpc-cni = {
      most_recent = true
    }
  }

  vpc_id                   = module.aws_vpc.vpc_id
  subnet_ids               = module.aws_vpc.public_subnets

  # EKS Managed Node Group(s)
  eks_managed_node_group_defaults = {
    instance_types = ["t3.small", "t3.medium", "t3.large", "t2.small"]
  }

  eks_managed_node_groups = {
    green = {
      min_size     = 1
      max_size     = 1
      desired_size = 1

      instance_types = ["t3.small"]
      capacity_type  = "SPOT"
    }
  }

  tags = local.common_tags
}

This file defines two EKS modules for the master cluster and one for the federated cluster in the AWS us-east-1 region.

In GCP, to start deploying the GKE clusters, we need to enable the Google APIs for compute, container, and cloudresourcemanager. To enable those APIs, execute these three commands.

> gcloud services enable compute.googleapis.com
> gcloud services enable container.googleapis.com
> gcloud services enable cloudresourcemanager.googleapis.com

To create networking resources for the GKE cluster in GCP, create a file named gcp-vpc.tf.

module "gcp-network" {
  source       = "terraform-google-modules/network/google"
  version      = "~> 6.0"
  project_id   = var.gcp_project_id
  network_name = "k8s-aws-gcp"
  subnets = [
    {
      subnet_name   = "gke-subnet-a"
      subnet_ip     = "10.50.0.0/16"
      subnet_region = "europe-west1"
    },
  ]
  secondary_ranges = {
    "gke-subnet-a" = [
      {
        range_name    = "ip-range-pods"
        ip_cidr_range = "10.60.0.0/16"
      },
      {
        range_name    = "ip-range-services"
        ip_cidr_range = "10.70.0.0/16"
      }
    ]
  }
}

Here we are creating VPC resources for the GKE cluster, including a subnet and IP ranges for Kubernetes and Pods and Services.

Next, to deploy the federated cluster in GKE, create a file called gcp-gke.tf.

module "gke" {
  source            = "terraform-google-modules/kubernetes-engine/google//modules/private-cluster"
  version           = "24.1.0"
  project_id        = var.gcp_project_id
  name              = "gcp-federated-cluster-a"
  regional          = true
  region            = "europe-west1"
  kubernetes_version = 1.24
  network           = module.gcp-network.network_name
  subnetwork        = module.gcp-network.subnets_names[0]
  ip_range_pods     = "ip-range-pods"
  ip_range_services = "ip-range-services"
  node_pools = [
    {
      name           = "node-pool"
      machine_type   = "e2-medium"
      node_locations = "europe-west1-b"
      min_count      = 1
      max_count      = 1
      disk_size_gb   = 10
    },
  ]
}

This file defines a module to deploy a GKE cluster in europe-west1 region and with Kubernetes version 1.24.

To start deploying the clusters in AWS and GCP, execute the below command to initialize and download the defined Terraform modules.

> terraform init 

Make sure to execute the above command from the same directory as Terraform files.

Once completed, you should see the below output line.

Terraform has been successfully initialized!

To verify the Terraform file syntax, execute the below command.

> terraform validate
Success! The configuration is valid.

Next, to run a plan, execute the below command.

> terraform plan

You should see an output similar to the one below.

Plan: 94 to add, 0 to change, 0 to destroy.

Next, run the below command to deploy the resources in AWS and GCP.

> terraform apply

Terraform will ask for confirmation to deploy the resources. You should see an output similar to the one below. Type yes and press Enter.

Do you want to perform these actions?
  Terraform will perform the actions described above.
  Only 'yes' will be accepted to approve.

  Enter a value: yes

The deployment might take up to 20 minutes.

K8s clusters handling 10B daily API calls use Kubecost

Once deployment is complete, you will see a confirmation message.

Apply complete!

Access clusters from your local terminal

To access the AWS EKS clusters for the local terminal, execute the below commands.

> aws eks update-kubeconfig --region us-east-1 --name master-cluster

> aws eks update-kubeconfig --region us-east-1 --name aws-federated-cluster-a

To access the GKE cluster from the local terminal, execute below commands.

> export USE_GKE_GCLOUD_AUTH_PLUGIN=true
> gcloud components install gke-gcloud-auth-plugin
> gcloud container clusters get-credentials --region europe-west1 gcp-federated-cluster-a

Above commands will install a component called gke-gcloud-auth-plugin. This is required to enable GKE access from the local terminal.

Next, we will rename these clusters for easier reference from the kubectl and deployment files.

> kubectl config rename-context arn:aws:eks:us-east-1:979450158315:cluster/master-cluster master-cluster

> kubectl config rename-context arn:aws:eks:us-east-1:979450158315:cluster/aws-federated-cluster-a aws-federated-cluster-a

> kubectl config rename-context gke_abhidevops-348717_europe-west1_gcp-federated-cluster-a gcp-federated-cluster-a

For the first two commands, 979450158315 is the AWS account ID.

For the third command, abhidevops-348717 defines the GCP project ID.

These values will be different in your case.

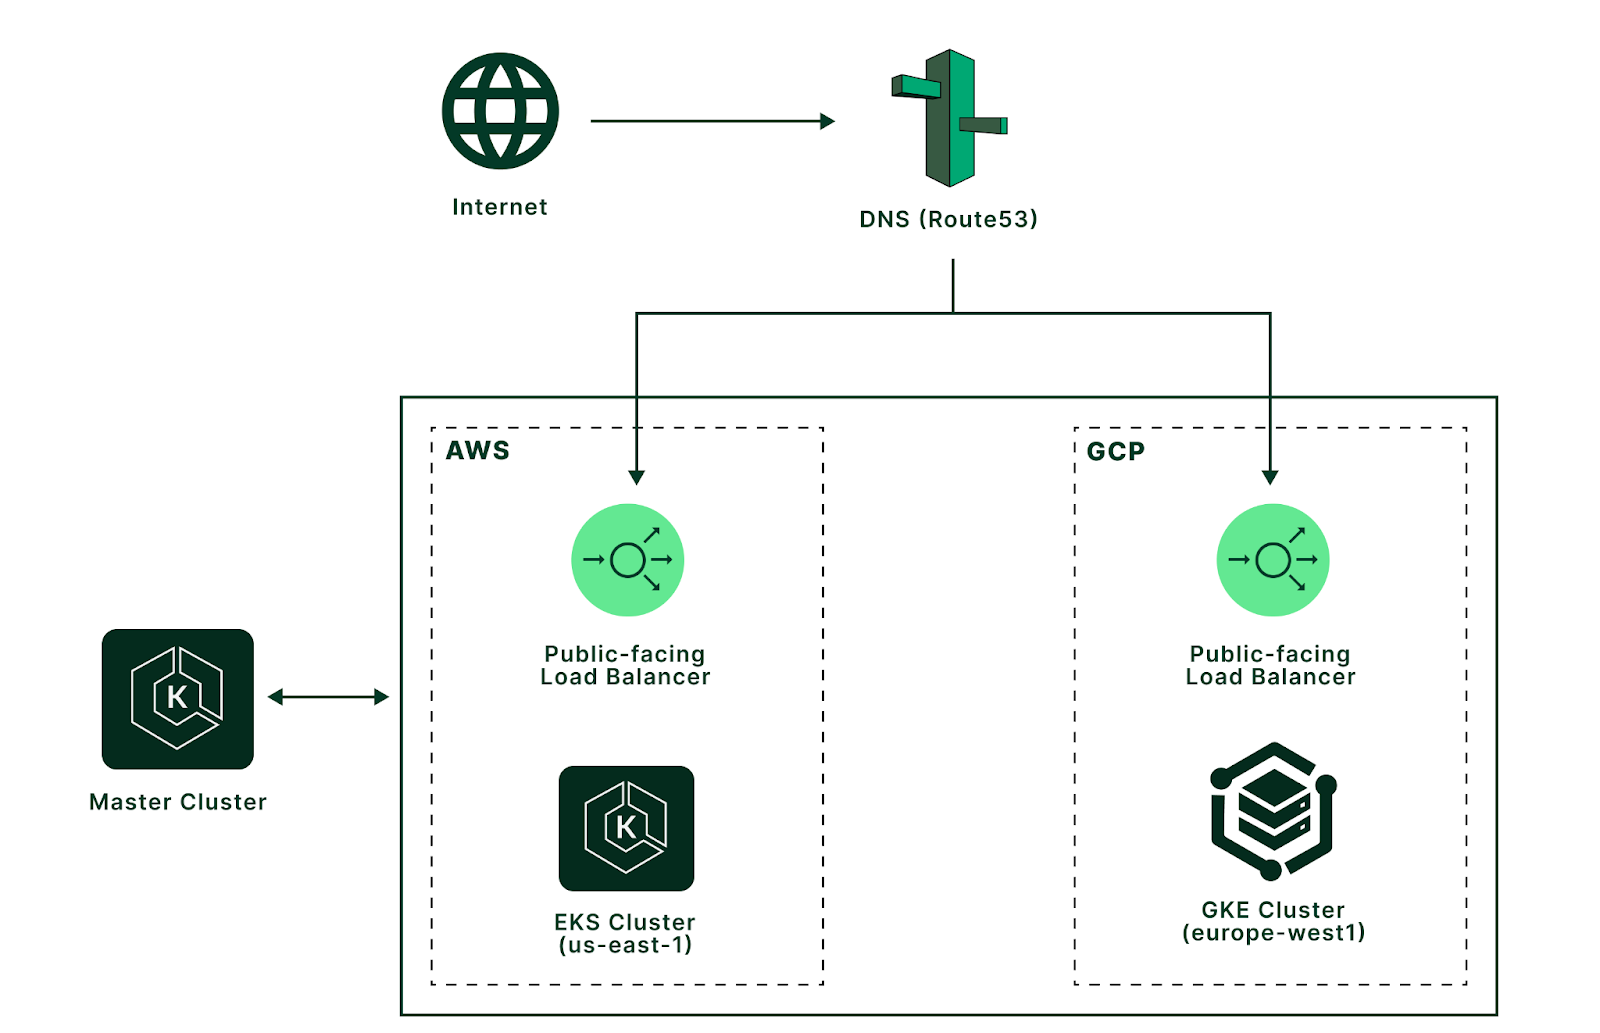
Connect clusters using Kubernetes Federation

Next, we will install Kubefed to manage multiple Kubernetes clusters using Kubernetes Federation.

First, we will select the master-cluster context.

> kubectl config use-context master-cluster

Switched to context "master-cluster".

Install Helm to deploy the Kubefed in the cluster. Once installed, verify the Helm version.

> helm version --short

To install kubefed in the master cluster, run the below commands:

> helm repo add kubefed-charts https://raw.githubusercontent.com/kubernetes-sigs/kubefed/master/charts


> helm repo update

Next, install a kubefed helm chart to the cluster, execute below command:

> helm --namespace kube-federation-system upgrade -i kubefed kubefed-charts/kubefed --create-namespace

The above command will install the kubefed in the kube-federation-system namespace.

To verify resources added by Kubefed in the master cluster, run the below command:

> kubectl get all -n kube-federation-system

To register the AWS EKS and GCP GKE clusters to the master cluster, and label the clusters as federation-enabled=true, execute below commands.

> kubefedctl join aws-federated-cluster-a --cluster-context aws-federated-cluster-a --host-cluster-context master-cluster --v=2

> kubefedctl join gcp-federated-cluster-a --cluster-context gcp-federated-cluster-a --host-cluster-context master-cluster --v=2

> kubectl label kubefedclusters -n kube-federation-system aws-federated-cluster-a federation-enabled=true

> kubectl label kubefedclusters -n kube-federation-system gcp-federated-cluster-a federation-enabled=true

Deploy Kubernetes deployments and services across clusters

To create all the Kubernetes deployment manifests, create a directory named k8s-deployments.

First, we will create a namespace on the master cluster and then deploy the namespace to all the federated clusters.

Create a file federated-ns.yaml in the k8s-deployments directory with the code block below.

apiVersion: v1
kind: Namespace
metadata:
  name: federated-ns
---
apiVersion: types.kubefed.io/v1beta1
kind: FederatedNamespace
metadata:
  name: federated-ns
  namespace: federated-ns
spec:
  placement:
    clusterSelector:
      matchLabels:
        federation-enabled: "true"

This manifest defines two resources Namespace and FederatedNamespace.

To apply these resources, execute:

> kubectl apply -f federated-ns.yaml

namespace/federated-ns created
federatednamespace.types.kubefed.io/federated-ns created

Next, we will create a sample-app deployment in the federated clusters.

Create a file called federated-deployment.yaml with below code block.

apiVersion: types.kubefed.io/v1beta1
kind: FederatedDeployment
metadata:
  name: sample-app
  namespace: federated-ns
spec:
  placement:
    clusterSelector:
      matchLabels:
        federation-enabled: "true"
  template:
    spec:
      selector:
        matchLabels:
          app: sample-app
      template:
        metadata:
          labels:
            app: sample-app
        spec:
          containers:
          - image: k8s.gcr.io/echoserver:1.10
            name: sample-app
            ports:
            - containerPort: 8080
              name: http
            - containerPort: 8443
              name: https

To apply this deployment, execute:

> kubectl apply -f federated-deployment.yaml

federateddeployment.types.kubefed.io/sample-app created

To verify the deployment of the sample-app, execute:

> kubectl get deployments --namespace federated-ns --context aws-federated-cluster-a
NAME         READY   UP-TO-DATE   AVAILABLE   AGE
sample-app   1/1     1            1           52s

> kubectl get deployments --namespace federated-ns --context gcp-federated-cluster-a
NAME         READY   UP-TO-DATE   AVAILABLE   AGE
sample-app   1/1     1            1           61s

We can confirm the deployment is successfully created in both clusters.

Next, we will create a Kubernetes Service of type LoadBalancer. This service will expose the sample-app to the outside of the cluster and create a load balancer in both cloud providers i.e., AWS and GCP.

Create a file named federated-svc.yaml.

apiVersion: types.kubefed.io/v1beta1
kind: FederatedService
metadata:
  name: sample-app-svc-lb
  namespace: federated-ns
spec:
  placement:
    clusterSelector:
      matchLabels:
        federation-enabled: "true"
  template:
    spec:
      ports:
      - name: http
        port: 80
        protocol: TCP
        targetPort: 8080
      selector:
        app: sample-app
      type: LoadBalancer

To create this service, execute:

> kubectl apply -f federated-svc.yaml

federatedservice.types.kubefed.io/sample-app-svc-lb created

To verify the service and loadbalancer creation, execute:

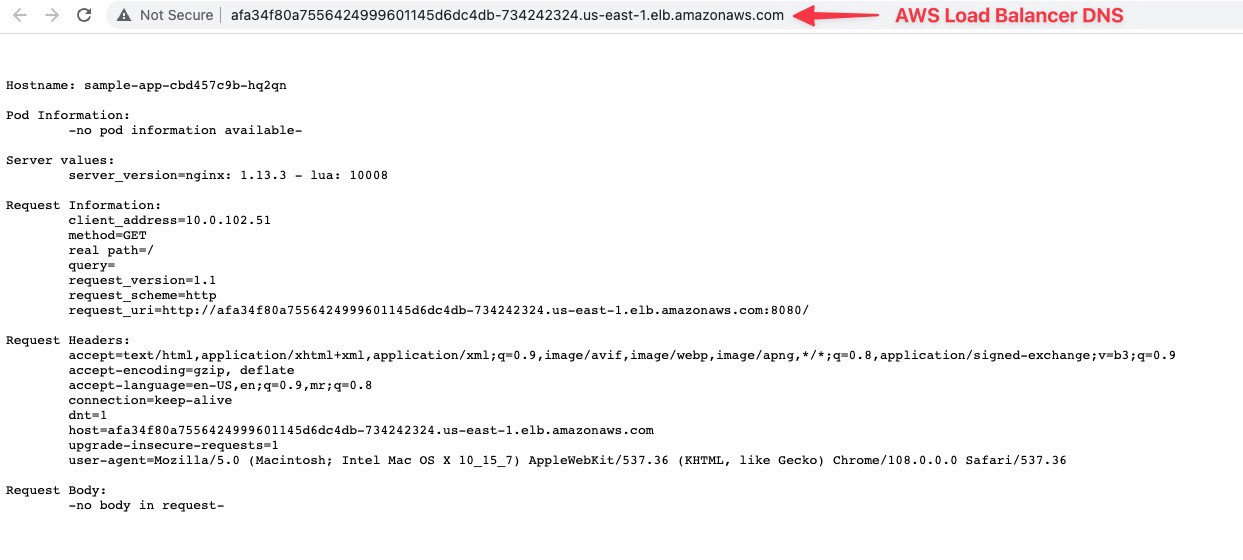
> kubectl get service --namespace federated-ns --context aws-federated-cluster-a

NAME                TYPE           CLUSTER-IP      EXTERNAL-IP                                                              PORT(S)        AGE
sample-app-svc-lb   LoadBalancer   172.20.106.96   afa34f80a7556424999601145d6dc4db-734242324.us-east-1.elb.amazonaws.com   80:31439/TCP   32s

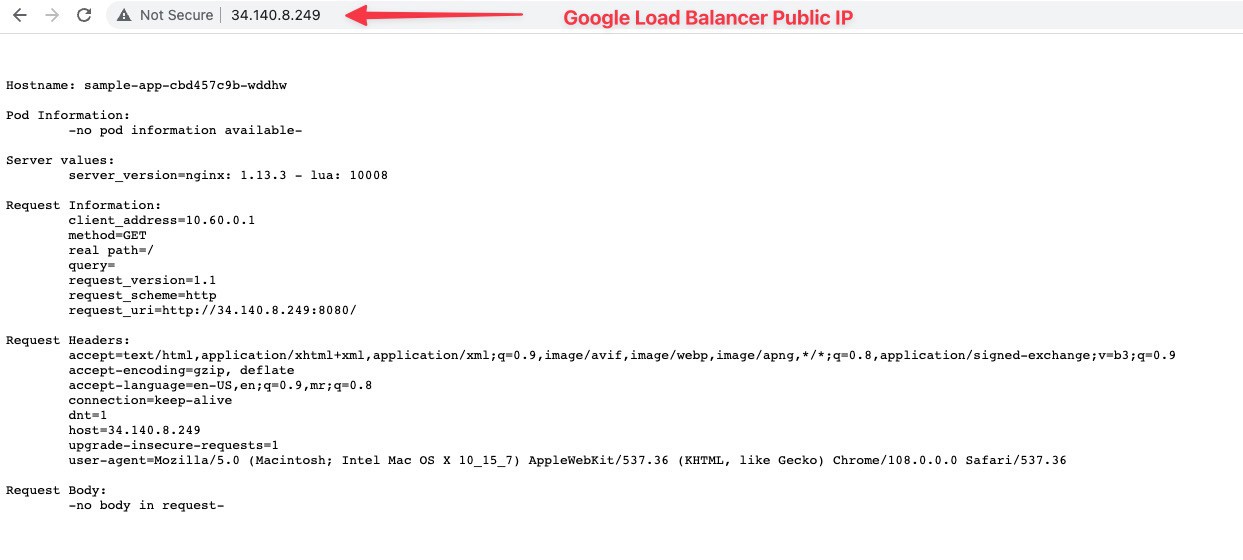
> kubectl get service --namespace federated-ns --context gcp-federated-cluster-a

NAME                TYPE           CLUSTER-IP     EXTERNAL-IP    PORT(S)        AGE
sample-app-svc-lb   LoadBalancer   10.70.193.74   34.140.8.249   80:32724/TCP   3m5s

We can verify the load balancer created in both the cluster across AWS and GCP.

We can browse the sample app using the load balancers’ public endpoint to verify the load balancer is working.

The GCP load balancer public IP.

The AWS load balancer DNS

Learn how to manage K8s costs via the Kubecost APIs

Manage traffic using DNS (AWS Route53)

So far, the sample app is deployed in EKS and GKE and accessible using the individual load balancer’s public endpoint.

To increase the efficiency of your Kubernetes clusters, you can choose from various load-balancing options to coordinate requests between all workloads. Services like F5 Distributed Cloud Load Balancer allow to connect and load balance across multi-cluster deployments securely. Also, services like AWS Route53, Cloudflare, and Akamai give the flexibility to use cloud-managed global DNS load balancing for multi-cluster deployments.

To access sample-app distributed across clusters using a single domain name, we will use the AWS Route53 service to manage DNS entries.

Route53 provides various routing policies to manage the traffic for DNS queries.

AWS Route53 routing policies.

In this example, we will use the Weighted Routing policy. Weighted Routing policy gives the option to split traffic based on weights. To keep this example straightforward, we will give weight as 50-50 to split traffic 50%-50% across the AWS Load balancer and GCP load balancer.

First, we need to create A type record for the GCP Load balancer, as it has an IPv4 endpoint.

This entry is of the following syntax.

<subdomain>.<domain>.<tld> 

Type A record for GCP load balancer

Next, we will create a record using a common DNS name and assign weighted routes to each load balancer’s public endpoint in AWS and GCP.

Weighted routes for load balancers’ public endpoints.

Now we can make a curl request to the common DNS, and we should see the traffic getting distributed across both clusters.

for i in {1..50};
do
    curl --silent <subdomain>.<domain>.<tld> | grep Hostname
    sleep 0.5
done
Hostname: sample-app-cbd457c9b-hq2qn
Hostname: sample-app-cbd457c9b-wddhw
Hostname: sample-app-cbd457c9b-hq2qn
Hostname: sample-app-cbd457c9b-wddhw
Hostname: sample-app-cbd457c9b-hq2qn
Hostname: sample-app-cbd457c9b-wddhw
Hostname: sample-app-cbd457c9b-hq2qn
Hostname: sample-app-cbd457c9b-wddhw
Hostname: sample-app-cbd457c9b-hq2qn
Hostname: sample-app-cbd457c9b-wddhw
Hostname: sample-app-cbd457c9b-hq2qn
Hostname: sample-app-cbd457c9b-wddhw
Hostname: sample-app-cbd457c9b-hq2qn
Hostname: sample-app-cbd457c9b-wddhw
Hostname: sample-app-cbd457c9b-hq2qn
Hostname: sample-app-cbd457c9b-wddhw
Hostname: sample-app-cbd457c9b-hq2qn
Hostname: sample-app-cbd457c9b-wddhw
Hostname: sample-app-cbd457c9b-hq2qn
Hostname: sample-app-cbd457c9b-wddhw
Hostname: sample-app-cbd457c9b-hq2qn
Hostname: sample-app-cbd457c9b-wddhw
Hostname: sample-app-cbd457c9b-hq2qn
Hostname: sample-app-cbd457c9b-wddhw

Above curl command gives the Pod name running in each cluster. We can verify each cluster's Pod name using the kubectl commands below.

> kubectl get pod --namespace federated-ns --context gcp-federated-cluster-a

> kubectl get pod --namespace federated-ns --context aws-federated-cluster-a

At this point,

  • We have successfully deployed the Kubernetes clusters in different cloud providers,
  • Managed both clusters using a master cluster,
  • Deployed a sample-app,
  • Accessed the sample-app using a single DNS name.

Clean up

To clean up the deployed resources,

First, from the k8s-deployments directory, execute the below command.

> kubectl delete -f .

federateddeployment.types.kubefed.io "sample-app" deleted
namespace "federated-ns" deleted
federatednamespace.types.kubefed.io "federated-ns" deleted
federatedservice.types.kubefed.io "sample-app-svc-lb" deleted

To clean up Terraform resources, execute below command.

> terraform destroy


Plan: 0 to add, 0 to change, 94 to destroy.
Do you really want to destroy all resources?
  Terraform will destroy all your managed infrastructure, as shown above.
  There is no undo. Only 'yes' will be accepted to confirm.

  Enter a value: yes

Kubernetes multi-cloud and multi-region best practices

The three best practices below can help you optimize cost and performance for Kubernetes clusters deployed across different clouds and regions.

Managing costs using Kubecost

Kubecost is a SaaS platform that provides real-time cost analytics for Kubernetes clusters across multiple environments. It enables you to monitor your clusters’ costs, with detailed information broken down by environment or cluster, so you can see where you are overspending or underspending. In addition to providing visibility into the cost of running each cluster, Kubecost also provides insights into ways to save costs by optimally scaling resources.

Kubecost connects directly with your cloud provider's API and collects data on your Kubernetes clusters. This data is then aggregated and organized in an intuitive dashboard so you can quickly get a comprehensive view of your spending habits across all clusters. The dashboard also includes actionable recommendations for reducing waste and optimizing resources, allowing you to make informed decisions about saving money on your deployments. Kubecost is free for one cluster forever.

ArgoCD for managing multi-cluster deployments using GitOps

ArgoCD is an open-source, declarative application deployment tool based on Kubernetes. It uses GitOps to declare an applications' desired state, allowing users to deploy applications with little effort quickly. It also provides visibility into the status of deployments, allowing teams to identify potential issues before they occur.

ArgoCD helps to streamline application management across multiple clouds or regions by providing a single point of entry for deployments.

Using GitOps principles, users can declare their desired state in version control systems and then have them automatically deployed without manually configuring each server or cluster.

Furthermore, ArgoCD helps reduce downtime by ensuring that all application deployments are consistent across all environments and that applications are always up-to-date with the latest versioning information available in the source repository.

Monitoring using Prometheus Thanos

When an application is deployed across multiple clouds or regions, it can be challenging to monitor performance efficiently due to the distributed nature of the infrastructure. Prometheus Thanos solves this problem by providing a single view into all your clusters regardless of where they are created. This makes it much easier to proactively detect issues early on rather than having them go unnoticed until they become serious. Additionally, since Prometheus Thanos stores data over long periods, you can easily spot any trends in your application’s performance that could indicate potential problems down the road.

Conclusion

By leveraging the features of Kubernetes, we can quickly deploy applications across multiple clouds or regions and manage them using a single master cluster.

Furthermore, by utilizing ArgoCD for GitOps and Prometheus Thanos for performance monitoring, teams can ensure that their deployments remain consistent while keeping an eye on any potential issues.

With these tools, managing distributed infrastructure becomes much simpler and more efficient. In short, deploying applications in a multi-cloud environment is no longer intimidating but provides immense opportunities when managed correctly.

Comprehensive Kubernetes cost monitoring & optimization

Continue reading this series