Learn how Kubernetes load balancers ensure high availability and optimal performance for applications.

Load Balancing in Kubernetes

When traffic is not evenly distributed across Kubernetes pods, some pods may become overloaded while others are underutilized. This can lead to performance problems, outages, and decreased scalability. A well-architected Kubernetes load balancer can solve this problem and ensure optimal application performance, availability, and scalability.

However, Kubernetes load balancing is challenging due to the dynamic nature of Kubernetes clusters, distributed pod deployment, and security needs such as:

  • Constant workload changes. Pods are constantly being created, updated, and removed, making it challenging to monitor healthy pods.
  • Distributed infrastructure. Pods are distributed across multiple nodes and regions, making it difficult to route traffic to the nearest pod.
  • Robust security requirements. Kubernetes applications require robust security measures, which adds another layer of complexity to the load-balancing process.

This article will explore key load balancer concepts for Kubernetes environments, including types of Kubernetes load balancing, best practices, and specific examples of implementing and managing Kubernetes load balancers.

Summary of key Kubernetes load balancer concepts

The table below summarizes the concepts this article will explore in more detail.

Concept Description
Basics of Kubernetes load balancing Learn how Kubernetes load balancers ensure high availability and optimal performance for applications.
Kubernetes load balancer policy Explore the differences between ClusterIP, LoadBalancer service types, etc.
Practical load balancing best practices To maximize efficiency, discover best practices for NodePort, ClusterIP, and LoadBalancer types and other load balancing practices.
Multi-cloud cluster balancing Understand the advantages of multi-cloud cluster balancing, enabling robust application scalability.
Load balancer costs in Kubernetes Gain insights into the cost considerations related to load balancing in Kubernetes and potential costs associated with different load-balancing techniques.

How does Kubernetes load balancing work?

Kubernetes provides several mechanisms for load balancing, both internal and external, to handle different scenarios and requirements.

Internal load balancing

Internal load balancing refers to distributing traffic within the Kubernetes cluster, typically among pods of the same application or service. Kubernetes uses a concept called Services to enable internal load balancing.

Internal load balancers are helpful for a variety of purposes, such as:

  • Distributing traffic evenly across pods to improve performance and reliability.
  • High availability ensures traffic can still be routed to pods even if some are unavailable.
  • Isolating traffic between different applications or services.

In Kubernetes, a ClusterIP service type creates an internal load balancer that exposes the service to pods within the same cluster. ClusterIP services do not have a public IP address and can only be accessed by pods within the cluster.

Kubernetes load balancer Service type - ClusterIP

External load balancing

In Kubernetes, External load balancing refers to distributing traffic from outside the Kubernetes cluster to appropriate pods within the cluster.

Kubernetes load balancer Service type - LoadBalancer

Kubernetes provides various options for external load balancing, including:

  • NodePort - The NodePort configuration setting exposes a specific port on each node in the cluster, allowing access to your service through that port. The Kubernetes control plane assigns a port within a specified range (typically 30000-32767). Each node then acts as a proxy for the same port number, ensuring consistent service access.
  • LoadBalancer - The LoadBalancer service type provisions an external load balancer, typically supplied by cloud providers, to distribute incoming traffic uniformly to the service. These services serve as traffic controllers, efficiently directing client requests to the appropriate nodes hosting your pods.
  • Ingress - Ingress is a native Kubernetes resource that exposes HTTP and HTTPS routes from outside the cluster to services within the cluster. It relies on rules set in the Ingress resource to control traffic routing. Like other native Kubernetes resources, it helps with DNS routing. The Ingress controller reads these rules from Ingress objects and can provide load balancing, SSL termination, and name-based virtual hosting.

Comprehensive Kubernetes cost monitoring & optimization

Kubernetes load balancer policy

Kubernetes uses various load-balancing algorithms to distribute traffic across backend pods within a service. The round-robin algorithm is among the most popular.

In round-robin, requests are distributed sequentially to each backend pod in the order they were added.

How to test round-robin Kubernetes load balancing

The steps below detail how you can test a round-robin Kubernetes load balancer.

Prerequisites: Take note that these examples assume you have a running Kubernetes cluster with kubectl and jq installed. Both tools are essential to working with Kubernetes and should be installed.

Step 1: Create a deployment
Let's start by creating a simple deployment using three replicas. This deployment will serve as the backend for our load balancer.

kubectl create deployment backend-app --image=bitnami/nginx:latest --replicas=3

Step 2: Expose the deployment
Next, we'll expose the deployment using a ClusterIP service. It will give us a single virtual IP address to access our backend replicas.

kubectl expose deployment backend-app --port=80 --target-port=80

Step 3: Retrieve the ClusterIP
To send requests to our service, we need to know the ClusterIP of the service. Run the following command to get the ClusterIP:

kubectl get svc backend-app -o json | jq .spec.clusterIP

Step 4: Testing round-robin Kubernetes load balancing
Using ClusterIP, we will route requests to the service and analyze how these requests are distributed among the backend replica pods.

# Replace <ClusterIP> with the actual ClusterIP from Step 3
for i in {1..10}; do
  curl <ClusterIP>
  echo "--"
done

Each pod should receive requests in a round-robin manner. We'll verify this by checking the pod logs.

# Replace <pod-name> with the actual name of the pod
kubectl logs -l app=backend-app

Likewise, other often used load-balancing algorithms include:

  • Least Connections: Direct traffic to the pod with the fewest active connections.
  • IP Hash: The algorithm uses a hash of the source IP address to determine which backend pod to send traffic to.
  • Random: Assign traffic randomly to one of the backend pods.
  • Weighted: Backend pods are assigned different weights, and traffic is distributed proportionally based on these weights.
  • Sticky Sessions: Directs a client's requests to a consistent backend pod for the entire session.

It's important to remember that the above load-balancing algorithms can differ based on the selected Ingress controller and the underlying cloud provider's infrastructure. To find the best strategy for your setup, consult their documentation.
By understanding these load distribution algorithms, Kubernetes administrators can fine-tune their load-balancing strategies to match the unique needs of their applications.

Kubernetes load balancer best practices

The sections below detail five practical Kubernetes load balancer best practices that teams can implement to improve their workload performance and availability.

Best practice #1: Select the right service type

One of the fundamental decisions in Kubernetes load balancing is choosing the appropriate service type.

In this example, we'll demonstrate how to deploy a “demo app” using different service types for load balancing within a Kubernetes cluster. We'll discuss the advantages of each service type and showcase why choosing one is better than another in different scenarios.

Step 1: Configure your Kubernetes cluster

Ensure you have a functioning Kubernetes cluster. You can set up a local cluster using Minikube or a cloud provider like Google Kubernetes Engine (GKE) or Amazon Elastic Kubernetes Service (EKS).

Step 2: Deploy the sample application

Create a file named “demo-deployment.yaml” with the following content:

apiVersion: apps/v1
kind: Deployment
metadata:
  name: demo-app
spec:
  replicas: 2
  selector:
    matchLabels:
      app: demo-app
  template:
    metadata:
      labels:
        app: demo-app
    spec:
      containers:
      - name: demo-container
        image: bitnami/nginx:latest
        ports:
        - containerPort: 80
K8s clusters handling 10B daily API calls use Kubecost

Apply the deployment :

kubectl apply -f demo-deployment.yaml

Step 3: Select the service type

ClusterIP Service
This type of service is only accessible within the Kubernetes cluster. It is suitable for scenarios where your application components need to communicate with each other within the cluster but shouldn't be directly accessible from outside.

Create a file named “clusterip-service.yaml” with the following content:

apiVersion: v1
kind: Service
metadata:
  name: clusterip-service
spec:
  type: ClusterIP
  selector:
    app: demo-app
  ports:
    - protocol: TCP
      port: 80
      targetPort: 80

Apply the service using the command:

kubectl apply -f clusterip-service.yaml

Verify the ClusterIP service by checking the service details:

kubectl get svc clusterip-service

This command will display the ClusterIP address assigned to the service.

Step 4: Verify the ClusterIP service

To verify that the ClusterIP functions as expected, create a busybox pod for testing using the following command:

kubectl run -i --tty busybox --image=busybox --restart=Never -- /bin/sh

Inside the busybox pod, use the wget command to access the ClusterIP service:

wget http://<clusterip>:<port>

You should be able to access the Apache default page, demonstrating that the ClusterIP service allows communication within the cluster.

To confirm that the ClusterIP service is limited to within the cluster, running the same wget command from a local machine will show that it is not accessible from outside the cluster.

NodePort Service NodePort is a simple way to allow external access to your application. But it isn't suitable for production due to limitations like no built-in SSL termination.

To create a NodePort service, change the type to the following in the service yaml:

type: NodePort

After applying the service, verify the NodePort service by checking the service details and accessing the application externally:

kubectl get svc demo-nodeport

We can access our application by using any of the worker node's IP addresses along with the NodePort. To find the IP address of the worker node, we can use the following command:

kubectl get nodes -o wide

Replace NODE_IP with the IP address of one of your cluster nodes and NODE_PORT with the NodePort assigned to the service:

wget http://NODE_IP:NODE_PORT

This demonstrates that we can access the application not only from within the cluster but also from the external system, making NodePort services suitable for development and testing.

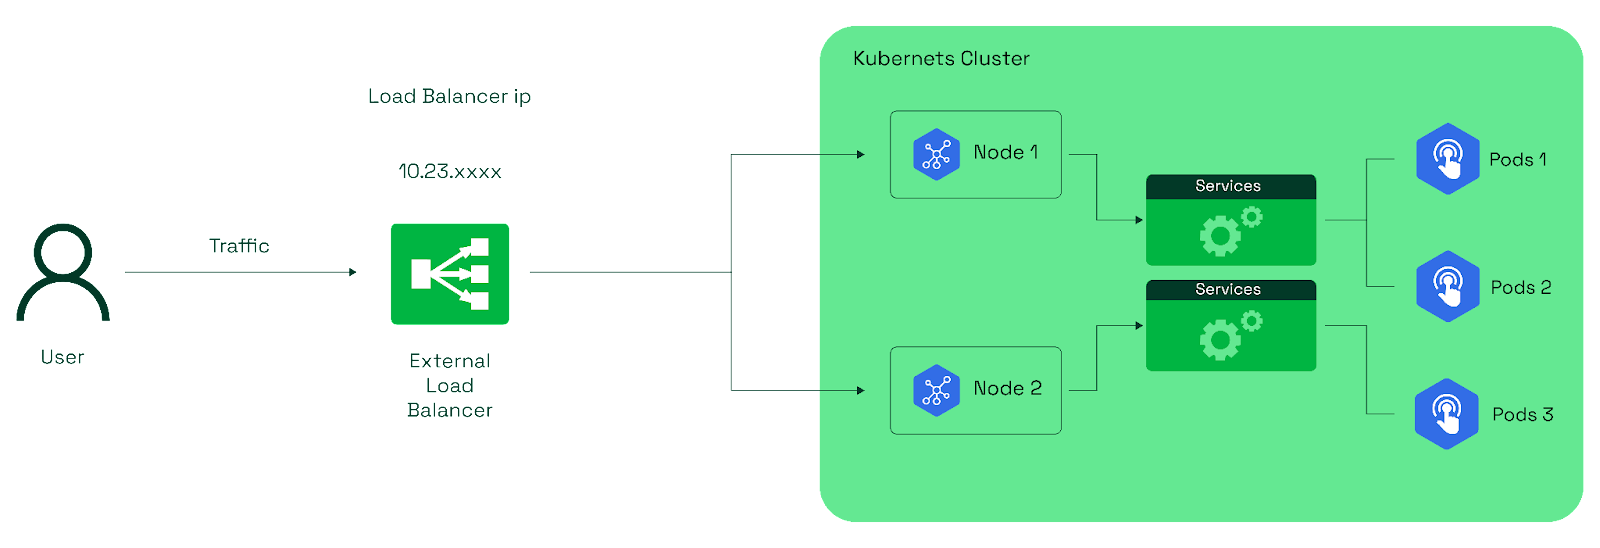
LoadBalancer Service
This is ideal for applications that require external access and automatic distribution of traffic across pods. It's well-suited for scenarios where high availability and scalability are essential.

Please note that the LoadBalancer service type is primarily designed for integration with external cloud platforms (e.g., AWS, GCP, Azure) that offer load-balancing services. This type of service might not behave the same way in local or on-premises Kubernetes setups.

To create a load balancer service, use the type in service:

type: LoadBalancer

Verify the LoadBalancer service by checking the service details and confirming the provisioned external IP:

kubectl get svc demo-loadbalancer

Here, the cloud provider's load balancer typically provides this external IP.

Once the cloud provider's load balancer assigns the external IP, we can use wget to access the Apache default page. Open a terminal or command prompt and run the following command:

wget http://<External-IP>

This will retrieve the content of the Apache default page and save it to your local directory.

Best practice #2: Use Kubernetes health checks and probes

Health checks and probes are essential for a robust Kubernetes load balancer setup. They ensure that your application's backend pods are responsive, healthy, and capable of handling incoming traffic. Here's why you should prioritize implementing health checks and probes:

  • Liveness probes: This check determines if a pod is still running and healthy. If a liveness probe fails, the load balancer will remove the pod from the load balancing pool.
  • Startup probes: This check ensures that only fully initialized pods are included in the load-balancing pool and prevents premature traffic. Thus, improving user experience and resource efficiency.
  • Readiness probes: This check determines if a pod is ready to receive traffic. Failing a readiness probe prevents the load balancer from directing traffic to the pod.

By configuring your Kubernetes load balancer with health checks and probes, you can keep your application running and prevent your resources from being wasted.

Learn how to manage K8s costs via the Kubecost APIs

Best practice #3: Design for high availability

High availability (HA) helps improve overall infrastructure resilience and business continuity. Here are three tips to help you design your Kubernetes load-balancing strategy with HA in mind:

  • Deploy Kubernetes load balancers across regions or zones. Distribute the load balancer instances across many zones or regions. It will help to ensure the load balancer is available even if one zone or region goes down.
  • Leverage PodDisruptionBudgets. Define “PodDisruptionBudgets” to limit the number of pods that can be unavailable during disruptions or maintenance activities.
  • Chaos Engineering. Practice chaos engineering to intentionally inject failures into your environment and observe how it behaves. This approach helps identify weaknesses in your HA strategy and allows you to address them before they become real issues.

Best practice #4: Auto-scale to efficiently handle loads

Efficient load handling is not just about distributing traffic; it's also about ensuring your backend pods can scale dynamically to meet demand. Implement Kubernetes' Horizontal Pod Autoscaler (HPA) to automatically adjust the number of pod replicas based on CPU or custom metrics.

Properly configuring HPA helps maintain consistent performance even during traffic spikes, preventing performance degradation and ensuring a responsive user experience. It's a fundamental tool for achieving effective load balancing in Kubernetes clusters.

# Create a Horizontal Pod Autoscaler
apiVersion: autoscaling/v2beta2
kind: HorizontalPodAutoscaler
metadata:
  name: my-app-hpa
spec:
  scaleTargetRef:
    apiVersion: apps/v1
    kind: Deployment
    name: my-app-deployment
  minReplicas: 2
  maxReplicas: 10
  metrics:
    - type: Resource
      resource:
        name: cpu
        targetAverageUtilization: 70

This HPA definition scales the “my-app-deployment” based on CPU utilization, ensuring that there are between 2 and 10 replicas to maintain an average CPU utilization of 70%.

Best practice #5: Implement strong security controls

To enhance the security of your load balancers and support the applications they serve, it’s crucial to implement certain security measures. Here are some recommended measures:

  • Access control: Use Kubernetes' RBAC (Role-Based Access Control) to restrict access to your load balancer configurations and ensure that only authorized personnel can make changes.
  • Firewall rules: Implement network policies and firewall rules to restrict incoming and outgoing traffic to only the necessary ports and IP addresses. This helps protect your load balancer from unauthorized access and potential attacks.
  • Use ClusterIP for internal communication: ClusterIP is a default Kubernetes service type that exposes only a set of pods internally. It is used for internal application communication and is unavailable outside the cluster.
  • Avoid NodePort for production: The NodePort service has several limitations, such as each service can only be assigned one port, only ports within the range of 30000–32767 are available, and changes in your Node/VM IP address can lead to complications. These factors can pose security risks and operational challenges, making NodePort less ideal for production scenarios.

Why consider multi-cloud cluster balancing?

Implementing load balancer providers and multi-cloud cluster balancing enables you to achieve seamless application performance across diverse infrastructures while avoiding vendor lock-in. Here's why these practices are essential:

  • Resilience: Distributing traffic across multiple cloud providers or regions enhances application resilience by reducing the impact of outages in a single location
  • Performance optimization: Load balancing ensures that user requests are routed to the nearest available resources, minimizing latency and enhancing user experience
  • Scalability: Balancing traffic across multiple cloud environments allows you to scale your application horizontally by adding instances as needed. Vendor Neutrality
  • Vendor lock-in: Multi-cloud strategies reduce dependency on a single cloud provider, allowing flexible service and pricing selection from multiple vendors
  • Cost optimization: Organizations can choose cost-effective services from each provider. For example, one provider may offer affordable computing resources, while another excels in cost-effective load-balancing services.

Why can multi-cloud Kubernetes load balancers be challenging?

Multi-cloud environments add additional considerations teams should address when creating a Kubernetes load-balancing strategy. Here are the key points to consider when designing a solution for a multi-cloud environment:

  • Complexity: In multi-cloud setups, each provider has its own networking and load-balancing services. It makes orchestrating across clouds complex.
  • Consistent Configuration: Ensuring configuration consistency across multiple cloud providers can be difficult. Deviations in load balancer configurations could lead to unpredictable application behavior and performance issues.
  • High availability and scalability: Synchronizing failover mechanisms and dynamically adapting to fluctuating traffic loads while maintaining consistent performance introduces technical complexities.
  • Identity and Access Management (IAM): Each cloud provider has its own IAM system for managing user access and permissions. Coordinating IAM policies across multiple clouds while maintaining a consistent level of security can be complex and error-prone.
  • Network Latency and Data Transfer Costs: Routing traffic between cloud providers can introduce delays, affecting application performance. Additionally, data transfers between providers may increase operational expenses. Balancing these factors is essential for efficient load management.

What factors contribute to load balancer costs?

Load balancer costs vary based on type, cloud provider, and features. It is essential to consider your needs and requirements before choosing a load balancer.

Below are five factors influencing the cost of load balancer usage in Kubernetes.

Traffic volume

The load balancer incurs data transfer charges according to the data it moves, with higher traffic resulting in increased expenses. Note that significant expenses can arise in cloud environments from network egress costs tied to data leaving the cloud provider's network. Efficient traffic management is essential to minimize these expenses.

Health checks and probes

Regular health checks increase load balancer expenses. Balancing monitoring frequency and cost-effectiveness is crucial for app health.

Geographical distribution

Expanding load balancers across regions or zones for redundancy and high availability may increase expenses. Deliberate planning of failover strategies and backup load balancers in different locations adds to these costs. Balancing these considerations is crucial to align availability needs with budget constraints.

Load balancer tier

Cloud providers offer various load balancer tiers with differing capabilities and pricing structures. Opting for the right tier is essential, as it determines the balance between advanced capabilities and pricing for your application's requirements.

Service type

Different service types, such as Layer 4 (TCP/UDP) and Layer 7 (HTTP/HTTPS), come with varying pricing. For example, a network load balancer is typically more expensive than a simple forwarding rule.

Conclusion

Kubernetes load balancers are critical to the seamless distribution of traffic to pods in a cluster. Whether from cloud or on-premises options, choosing the right load balancer provider depends on your operational needs. Moreover, as the Kubernetes ecosystem continues to grow, so do the choices for load balancing. Hence, regular assessment of load balancing strategy is crucial to ensure it aligns with your business goals and technological landscape.

Also, it is worthwhile to investigate third-party solutions if you are seeking advanced capabilities or insights. These tools offer features, such as cost optimization and insightful analytics, which go beyond the basic capabilities of native load balancers. Investigating such options is a wise move to boost the efficiency and performance of your Kubernetes cluster.

Comprehensive Kubernetes cost monitoring & optimization

Continue reading this series