Scalability is one of the core benefits of Kubernetes (K8s). In order to get the most out of this benefit (and use K8s effectively), you need a solid understanding of how Kubernetes autoscaling works. In our previous post[link], we covered Vertical Pod Autoscaling (VPA). Here, we’ll take a deep dive on the topic of Horizontal Pod Autoscaling (HPA) in Kubernetes. We’ll define HPA, explain how it works, and provide a detailed hands-on tutorial to walk you through a sample project using HPA.
Learn Kubernetes HPA’s functionality and limitations with examples and understand how to use it with other Kubernetes autoscaling methods.
Chapter 2:
Kubernetes HPA
Kubernetes autoscaling basics
Before we go in-depth on HPA, we need to review Kubernetes autoscaling in general. Autoscaling is a method of automatically scaling K8s workloads up or down based on historical resource usage. Autoscaling in Kubernetes has three dimensions:
- Horizontal Pod Autoscaler (HPA):adjusts the number of replicas of an application.
- Cluster Autoscaler:adjusts the number of nodes of a cluster.
- Vertical Pod Autoscaler (VPA):adjusts the resource requests and limits of a container.
The different autoscalers work at one of two Kubernetes layers
- Pod level:The HPA and VPA methods take place at the pod level. Both HPA and VPA will scale the available resources or instances of the container.
- Cluster level:The Cluster Autoscaler falls under the Cluster level, where it scales up or down the number of nodes inside your cluster.
Now that we have summarized the basics, let’s take a closer look at HPA.
What is HPA?
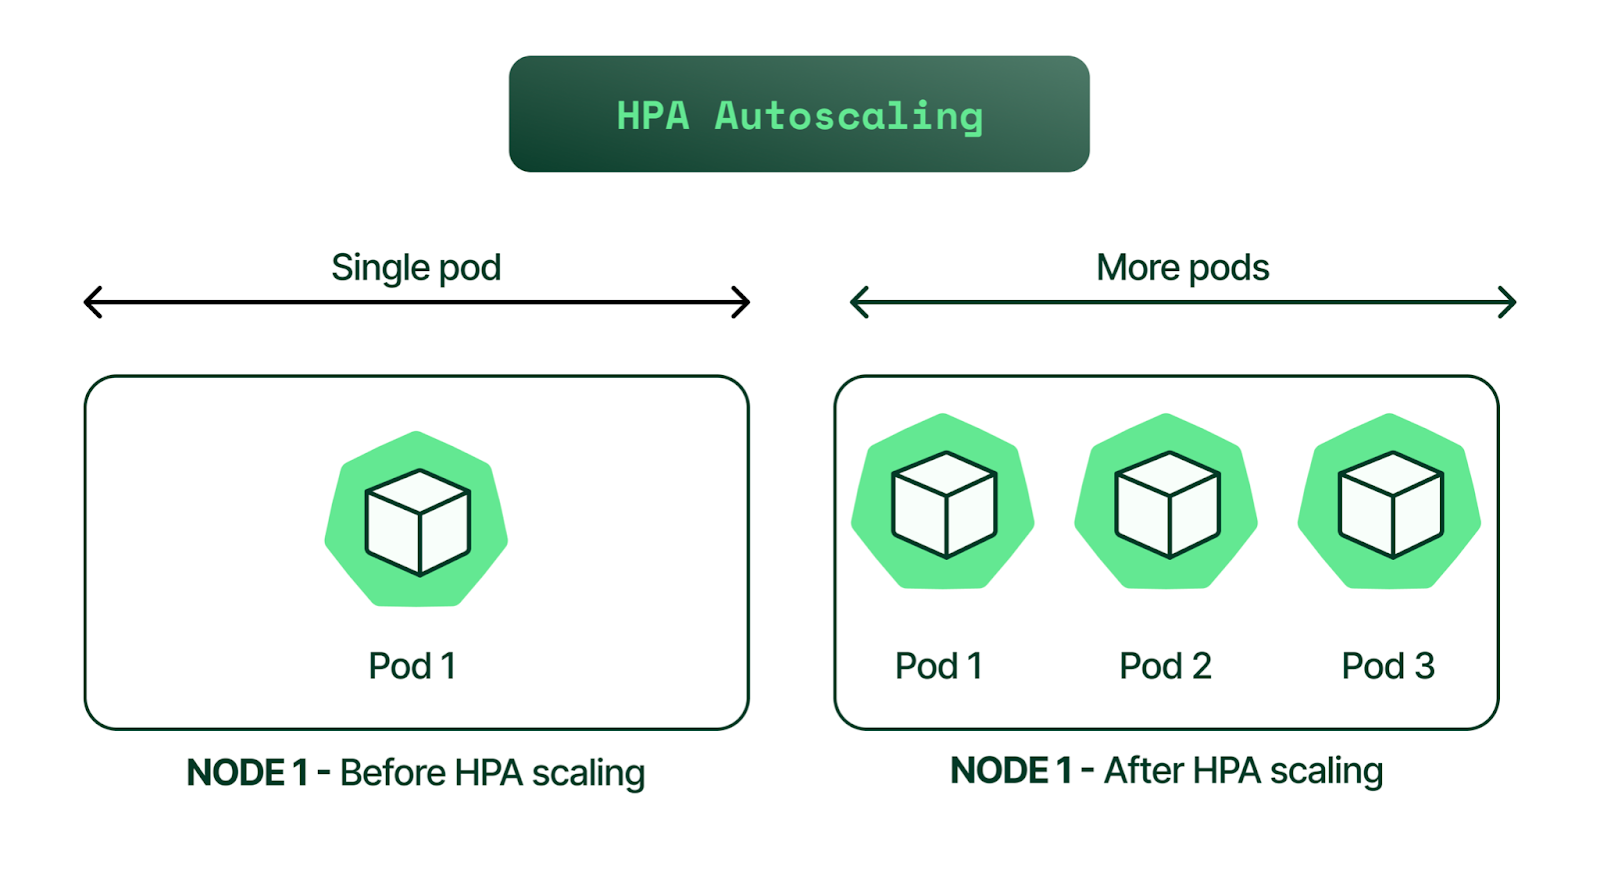
HPA is a form of autoscaling that increases or decreases the number of pods in a replication controller, deployment, replica set, or stateful set based on CPU utilization—the scaling is horizontal because it affects the number of instances rather than the resources allocated to a single container.
HPA can make scaling decisions based on custom or externally provided metrics and works automatically after initial configuration. All you need to do is define the MIN and MAX number of replicas.
Once configured, the Horizontal Pod Autoscaler controller is in charge of checking the metrics and then scaling your replicas up or down accordingly. By default, HPA checks metrics every 15 seconds.
To check metrics, HPA depends on another Kubernetes resource known as the Metrics Server. The Metrics Server provides standard resource usage measurement data by capturing data from “kubernetes.summary_api” such as CPU and memory usage for nodes and pods. It can also provide access to custom metrics (that can be collected from an external source) like the number of active sessions on a load balancer indicating traffic volume.
While the HPA scaling process is automatic, you can also help account for predictable load fluctuations in some cases. For example, you can:
- Adjust replica count based on the time of the day.
- Set different capacity requirements for weekends or off-peak hours.
- Implement an event-based replica capacity schedule (such as increasing capacity upon a code release).
How does HPA work?
Overview of HPA
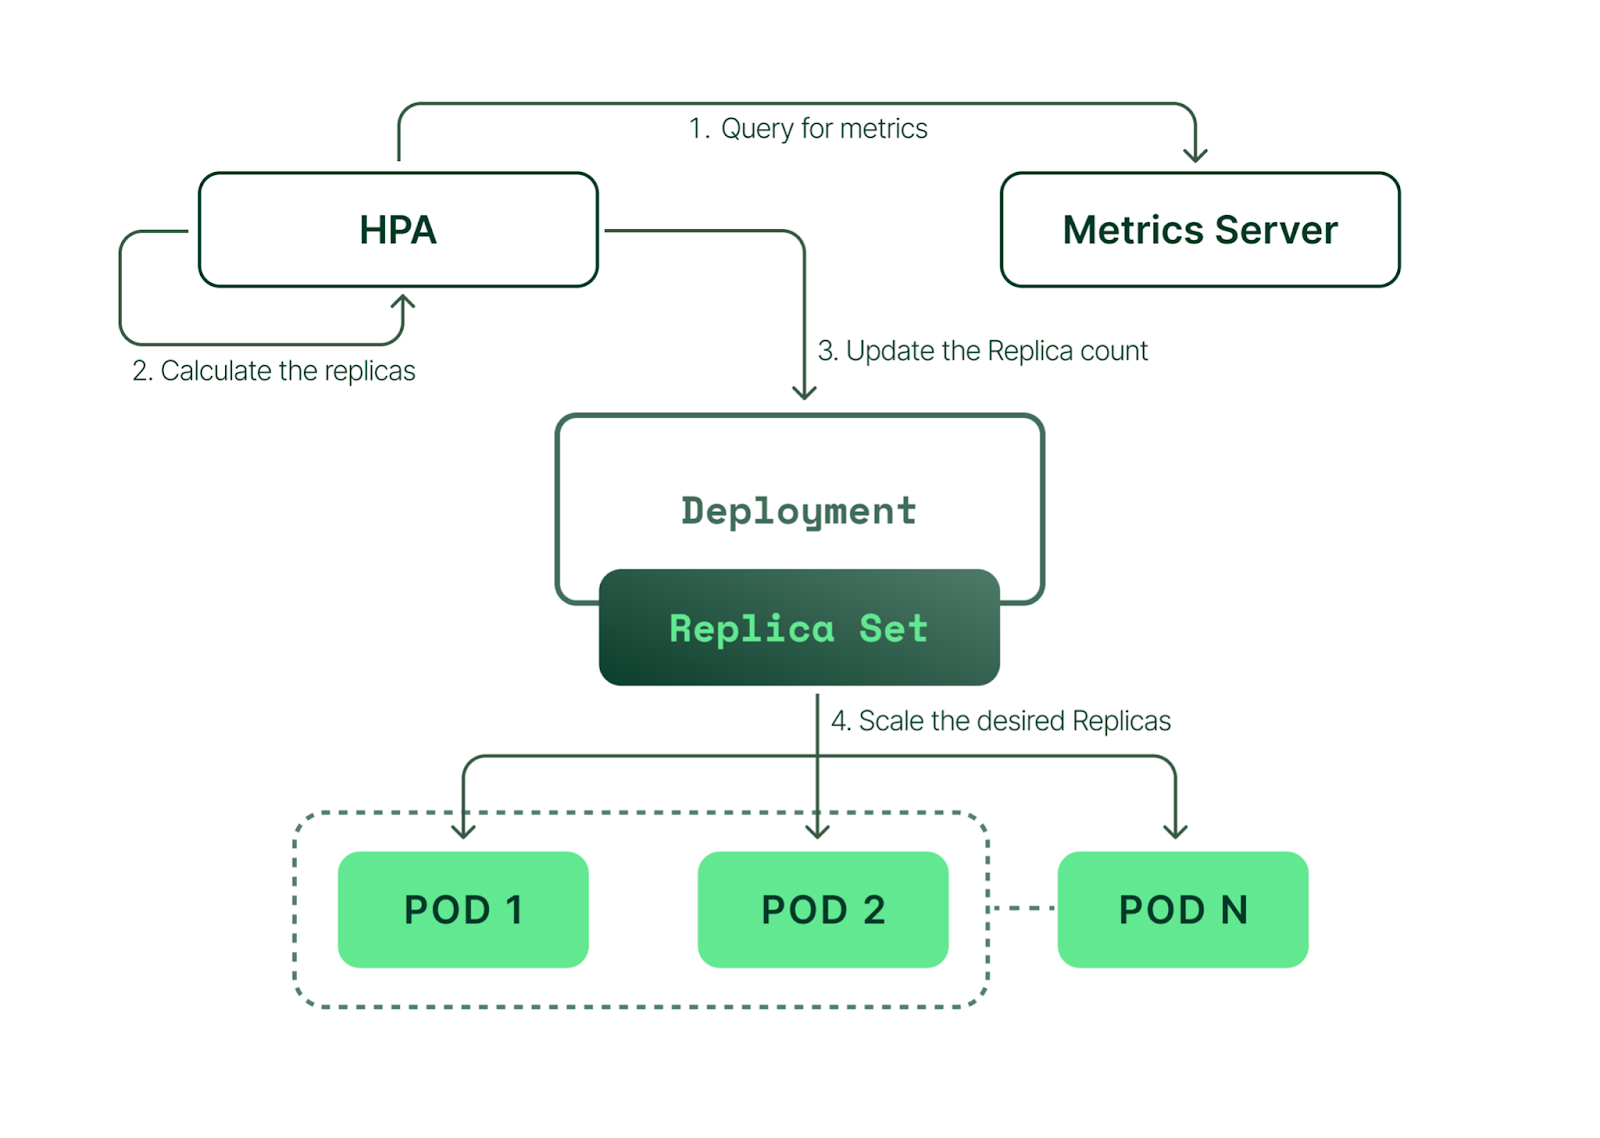
In simple terms, HPA works in a “check, update, check again” style loop. Here’s how each of the steps in that loop work.
- HPA continuously monitors the metrics server for resource usage.
- Based on the collected resource usage, HPA will calculate the desired number of replicas required.
- Then, HPA decides to scale up the application to the desired number of replicas.
- Finally, HPA changes the desired number of replicas.
- Since HPA is continuously monitoring, the process repeats from Step 1.
Limitations of HPA
While HPA is a powerful tool, it’s not ideal for every use case and can’t address every cluster resource issue. Here are the most common examples:
- One of HPA’s most well-known limitations is that it does not work with DaemonSets.
- If you don’t efficiently set CPU and memory limits on pods, your pods may terminate frequently or, on the other end of the spectrum, you’ll waste resources.
- If the cluster is out of capacity, HPA can’t scale up until new nodes are added to the cluster. Cluster Autoscaler (CA) can automate this process. We have an article dedicated to CA; however, below is a quick contextual explanation.
Cluster Autoscaler (CA) automatically adds or removes nodes in a cluster based on resource requests from pods. Unlike HPA, Cluster Autoscaler doesn't look at memory or CPU available when it triggers the autoscaling. Instead, Cluster Autoscaler reacts to events and checks for any unscheduled pods every 10 seconds.
Comprehensive Kubernetes cost monitoring & optimization
EKS Example: How to Implement HPA
To help you get started with HPA, let’s walk through some practical examples. We’ll work through the following steps one-by-one:
- Create an EKS cluster
- Install the Metrics Server
- Deploy a sample application
- Install Horizontal Pod Autoscaler
- Monitor HPA events
- Decrease the load
Step 1: create an EKS cluster
For this step, we will use AWS EKS (Amazon's managed Kubernetes service), so make sure you have access to your AWS account. We’ll use eksctl, a simple CLI tool for creating and managing clusters on EKS. It is written in Go and uses CloudFormation in the background.
The EKS cluster kubeconfig file will be stored in the local directory (of your workstation or laptop), and if the command is successful, you will see a ready status. To begin, we’ll run the eksctl create cluster command below (using Kubernetes version 1.20 in this example).
$ eksctl create cluster  --name example-hpa-autoscaling  --version 1.20  --region us-west-2  --nodegroup-name hpa-worker-instances  --node-type c5.large  --nodes 1
2021-08-30 12:52:24 [ℹ]  eksctl version 0.60.0
2021-08-30 12:52:24 [ℹ]  using region us-west-2
2021-08-30 12:52:26 [ℹ]  setting availability zones to [us-west-2a us-west-2b us-west-2d]
2021-08-30 12:52:26 [ℹ]  subnets for us-west-2a - public:192.168.0.0/19 private:192.168.96.0/19
2021-08-30 12:52:26 [ℹ]  subnets for us-west-2b - public:192.168.32.0/19 private:192.168.128.0/19
2021-08-30 12:52:26 [ℹ]  subnets for us-west-2d - public:192.168.64.0/19 private:192.168.160.0/19
2021-08-30 12:52:26 [ℹ]  nodegroup "hpa-worker-instances" will use "" [AmazonLinux2/1.20]
2021-08-30 12:52:26 [ℹ]  using Kubernetes version 1.20
2021-08-30 12:52:26 [ℹ]  creating EKS cluster "example-hpa-autoscaling" in "us-west-2" region with managed nodes
...
...
2021-08-30 12:53:29 [ℹ]  waiting for CloudFormation stack
2021-08-30 13:09:00 [ℹ]  deploying stack "eksctl-example-hpa-autoscaling-nodegroup-hpa-worker-instances"
2021-08-30 13:09:00 [ℹ]  waiting for CloudFormation stack
2021-08-30 13:12:11 [ℹ]  waiting for the control plane availability...
2021-08-30 13:12:11 [✔]  saved kubeconfig as "/Users/karthikeyan/.kube/config"
2021-08-30 13:12:11 [ℹ]  no tasks
2021-08-30 13:12:11 [✔]  all EKS cluster resources for "example-hpa-autoscaling" have been created
2021-08-30 13:12:13 [ℹ]  nodegroup "hpa-worker-instances" has 1 node(s)
2021-08-30 13:12:13 [ℹ]  node "ip-192-168-94-150.us-west-2.compute.internal" is ready
2021-08-30 13:12:13 [ℹ]  waiting for at least 1 node(s) to become ready in "hpa-worker-instances"
2021-08-30 13:12:13 [ℹ]  nodegroup "hpa-worker-instances" has 1 node(s)
2021-08-30 13:12:13 [ℹ]  node "ip-192-168-94-150.us-west-2.compute.internal" is ready
2021-08-30 13:14:20 [ℹ]  kubectl command should work with "/Users/karthikeyan/.kube/config", try 'kubectl get nodes'
2021-08-30 13:14:20 [✔]  EKS cluster "example-hpa-autoscaling" in "us-west-2" region is ready
Next, verify the cluster:
$ aws eks describe-cluster --name my-hpa-demo-cluster --region us-west-2You can also check by logging into the AWS console:

To get the cluster context to log in, read your local kubeconfig like below:
$ cat  ~/.kube/config |grep "current-context"
current-context: bob@my-hpa-demo-cluster.us-west-2.eksctl.io
List the nodes and pods:
$ kubectx bob@example-hpa-autoscaling.us-west-2.eksctl.io
Switched to context "bob@example-hpa-autoscaling.us-west-2.eksctl.io".

$ kubectl get nodes
NAME                                           STATUS   ROLES    AGE   VERSION
ip-192-168-94-150.us-west-2.compute.internal   Ready       15m   v1.20.4-eks-6b7464


$ kubectl get pods --all-namespaces
NAMESPACE     NAME                       READY   STATUS    RESTARTS   AGE
kube-system   aws-node-f45pg             1/1     Running   0          15m
kube-system   coredns-86d9946576-2h2zk   1/1     Running   0          24m
kube-system   coredns-86d9946576-4cvgk   1/1     Running   0          24m
kube-system   kube-proxy-864g6           1/1     Running   0          15m
kubectx is a tool used to switch between various Kubernetes clusters. Now that we have the EKS cluster up and running, next, we need to deploy the Metrics Server.
Install the Metrics Server
We can check if we have set up the Metrics Server in our EKS cluster by using the following command:
$ kubectl top pods -n kube-system
error: Metrics API not available
📝 Note: For this process, we have created a directory named “/Users/bob/hpa/” on our local laptop and saved all configuration files used in this article to that location. We recommend creating a similar directory on your local workstation to download all required files (mentioned below).
Let’s install the Metrics Server. Download the YAML files from: https://github.com/nonai/k8s-example-files/tree/main/metrics-server
$ cd /Users/bob/hpa/metrics-server && ls -l
total 56
-rw-r--r--  1 bob  1437157072   136 Aug 30 13:48 0-service-account.yaml
-rw-r--r--  1 bob  1437157072   710 Aug 30 13:48 1-cluster-roles.yaml
-rw-r--r--  1 bob  1437157072   362 Aug 30 13:48 2-role-binding.yaml
-rw-r--r--  1 bob  1437157072   667 Aug 30 13:48 3-cluster-role-bindings.yaml
-rw-r--r--  1 bob  1437157072   254 Aug 30 13:48 4-service.yaml
-rw-r--r--  1 bob  1437157072  1659 Aug 30 13:48 5-deployment.yaml
-rw-r--r--  1 bob  1437157072   331 Aug 30 13:48 6-api-service.yaml
Once you have downloaded the file, run the below command to create all of the resources:
$ kubectl apply -f .
serviceaccount/metrics-server created
clusterrole.rbac.authorization.k8s.io/system:aggregated-metrics-reader created
clusterrole.rbac.authorization.k8s.io/system:metrics-server created
rolebinding.rbac.authorization.k8s.io/metrics-server-auth-reader created
clusterrolebinding.rbac.authorization.k8s.io/metrics-server:system:auth-delegator created
clusterrolebinding.rbac.authorization.k8s.io/system:metrics-server created
service/metrics-server created
deployment.apps/metrics-server created
apiservice.apiregistration.k8s.io/v1beta1.metrics.k8s.io created
Verify the Metrics Server deployment:
$ kubectl get pods --all-namespaces
NAMESPACE     NAME                             READY   STATUS    RESTARTS   AGE
kube-system   aws-node-982kv                   1/1     Running   0          14m
kube-system   aws-node-rqbg9                   1/1     Running   0          13m
kube-system   coredns-86d9946576-9k6gx         1/1     Running   0          25m
kube-system   coredns-86d9946576-m67h6         1/1     Running   0          25m
kube-system   kube-proxy-lcklc                 1/1     Running   0          13m
kube-system   kube-proxy-tk96q                 1/1     Running   0          14m
kube-system   metrics-server-9f459d97b-q5989   1/1     Running   0          41s
List services in the kube-system namespace:
$ kubectl get svc -n kube-system
NAME             TYPE        CLUSTER-IP      EXTERNAL-IP   PORT(S)         AGE
kube-dns         ClusterIP   10.100.0.10             53/UDP,53/TCP   26m
metrics-server   ClusterIP   10.100.66.231           443/TCP         82s
Use kubectl to see CPU and memory metrics:
$ kubectl top pods -n kube-system
NAME                             CPU(cores)   MEMORY(bytes)
aws-node-982kv                   4m           40Mi
aws-node-rqbg9                   5m           39Mi
coredns-86d9946576-9k6gx         2m           8Mi
coredns-86d9946576-m67h6         2m           8Mi
kube-proxy-lcklc                 1m           11Mi
kube-proxy-tk96q                 1m           11Mi
metrics-server-9f459d97b-q5989   3m           15Mi
Deploy a sample application
Now, we are going to use a custom Docker image that runs on Apache and PHP to… . The Docker image is publicly accessible, so we can refer to it directly from our Kubernetes deployment.
Let’s deploy the application as part of our Kubernetes cluster, maintaining a minimum of 1 replica and a maximum of 10 replicas. Below is the configuration, which you can save as “deployment.yml”.
$ cd /Users/bob/hpa/
$ cat deployment.yml

apiVersion: apps/v1
kind: Deployment
metadata:
 name: hpa-demo-deployment
spec:
 selector:
   matchLabels:
     run: hpa-demo-deployment
 replicas: 1
 template:
   metadata:
     labels:
       run: hpa-demo-deployment
   spec:
     containers:
     - name: hpa-demo-deployment
       image: k8s.gcr.io/hpa-example
       ports:
       - containerPort: 80
       resources:
         limits:
           cpu: 500m
         requests:
           cpu: 200m
Apply it by running:
$ kubectl apply -f deployment.yml
deployment.apps/hpa-demo-deployment created

$ kubectl get pods
NAME                                   READY   STATUS    RESTARTS   AGE
hpa-demo-deployment-6b988776b4-b2hkb   1/1     Running   0          20s
We created the deployment successfully. Next, let’s get the list of deployment status:
$ kubectl get deploy
NAME                  READY   UP-TO-DATE   AVAILABLE   AGE
hpa-demo-deployment   1/1     1            1           9s
Kubecost + StormForge = Automated K8s Cost Optimization
Create the Kubernetes service
For our next step, we have to create a service. The sample application will listen to the public endpoint by using this service. Create a service configuration file with the following content:
$ cd /Users/bob/hpa/
$ cat service.yaml
apiVersion: v1
kind: Service
metadata:
 name: hpa-demo-deployment
 labels:
   run: hpa-demo-deployment
spec:
 ports:
 - port: 80
 selector:
   run: hpa-demo-deployment
This service will be a front-end to the deployment we created above, which we can access via port 80.
Apply the changes:
$ kubectl apply -f service.yaml
service/hpa-demo-deployment created
We have created the service. Next, let’s list the service and see the status:
$ kubectl get svc
NAME                  TYPE        CLUSTER-IP       EXTERNAL-IP   PORT(S)   AGE
hpa-demo-deployment   ClusterIP   10.100.124.139           80/TCP    7s
kubernetes            ClusterIP   10.100.0.1               443/TCP   172m
Here, we can see:
- hpa-demo-deployment = Service Name
- 10.100.124.139 = IP address of the service, and it is open on Port 80/TCP
Install the Horizontal Pod Autoscaler
We now have the sample application as part of our deployment, and the service is accessible on port 80. To scale our resources, we will use HPA to scale up when traffic increases and scale down the resources when traffic decreases.
Let’s create the HPA configuration file as shown below:
$ cd /Users/bob/hpa/
$ cat hpa.yaml
apiVersion: autoscaling/v1
kind: HorizontalPodAutoscaler
metadata:
 name: hpa-demo-deployment
spec:
 scaleTargetRef:
   apiVersion: apps/v1
   kind: Deployment
   name: hpa-demo-deployment
 minReplicas: 1
 maxReplicas: 10
 targetCPUUtilizationPercentage: 50
Apply the changes:
$ kubectl apply -f hpa.yaml
horizontalpodautoscaler.autoscaling/hpa-demo-deployment created
Verify the HPA deployment:
$ kubectl get hpa
NAME                  REFERENCE                      TARGETS  MINPODS MAXPODS REPLICAS   AGE
hpa-demo-deployment   Deployment/hpa-demo-deployment 0%/50%    1       10      0          8s
The above output shows that the HPA maintains between 1 and 10 replicas of the pods controlled by the hpa-demo-deployment. In the example shown above (see the column titled “TARGETS”), the target of 50% is the average CPU utilization that the HPA needs to maintain, whereas the target of 0% is the current usage.
If we want to change the MIN and MAX values, we can use this command:
📝Note: Since we already have the same MIN/MAX values, the output throws an error that says it already exists.
Increase the load
So far, we have set up our EKS cluster, installed the Metrics Server, deployed a sample application, and created an associated Kubernetes service for the application. We also deployed HPA, which will monitor and adjust our resources.
To test HPA in real-time, let’s increase the load on the cluster and check how HPA responds in managing the resources.
First, let’s check the current status of the deployment:
$ kubectl get deploy
NAME                  READY   UP-TO-DATE   AVAILABLE   AGE
hpa-demo-deployment           1/1     1            1           23s
Next, we will start a container and send an infinite loop of queries to the ‘php-apache’ service, listening on port 8080. Open a new terminal and execute the below command:
# kubectl run -i --tty load-generator --rm --image=busybox --restart=Never -- /bin/sh -c "while sleep 0.01; do wget -q -O- http://hpa-demo-deployment; done"📝Note: If you do not have DNS entries for the service, use the service name.
To view the service name:
$ kubectl get svc
NAME                   TYPE        CLUSTER-IP      EXTERNAL-IP   PORT(S)   AGE
hpa-demo-deployment    ClusterIP   10.100.95.188           80/TCP    10m
Before we increase the load, the HPA status will look like this:
$ kubectl get hpa
NAME                REFERENCE                     TARGETS  MINPODS MAXPODS REPLICAS   AGE
hpa-demo-deployment Deployment/hpa-demo-deployment 0%/50%   1        10       1        12m
K8s clusters handling 10B daily API calls use Kubecost
Once you triggered the load test, use the below command, which will show the status of the HPA every 30 seconds:
$ kubectl get hpa -w
NAME                REFERENCE                      TARGETS MINPODS MAXPODS REPLICAS AGE
hpa-demo-deployment Deployment/hpa-demo-deployment  0%/50%  1      10      1        15m
...
...
hpa-demo-deployment Deployment/hpa-demo-deployment  38%/50% 1      10      8        25m
Here, you can see that as our usage went up, the number of pods scaled from 1 to 7:
$ kubectl get deployment php-apache
NAME                READY   UP-TO-DATE   AVAILABLE     AGE
hpa-demo-deployment   7/7     7            7           21m
You can also see pod usage metrics. The load-generator pod generates the load for this example:
$ kubectl top pods --all-namespaces
NAMESPACE     NAME                                   CPU(cores)   MEMORY(bytes)
default       hpa-demo-deployment-6b988776b4-b2hkb   1m           10Mi
default       load-generator                         10m          1Mi
default       hpa-demo-deployment-d4cf67d68-2x89h    97m          12Mi
default       hpa-demo-deployment-d4cf67d68-5qxgm    86m          12Mi
default       hpa-demo-deployment-d4cf67d68-ddm54    131m         12Mi
default       hpa-demo-deployment-d4cf67d68-g6hhw    72m          12Mi
default       hpa-demo-deployment-d4cf67d68-pg67w    123m         12Mi
default       hpa-demo-deployment-d4cf67d68-rjp77    75m          12Mi
default       hpa-demo-deployment-d4cf67d68-vnd8k    102m         12Mi
kube-system   aws-node-982kv                         4m           41Mi
kube-system   aws-node-rqbg9                         4m           40Mi
kube-system   coredns-86d9946576-9k6gx               4m           9Mi
kube-system   coredns-86d9946576-m67h6               4m           9Mi
kube-system   kube-proxy-lcklc                       1m           11Mi
kube-system   kube-proxy-tk96q                       1m           11Mi
kube-system   metrics-server-9f459d97b-q5989         4m           17Mi
Monitor HPA events
If you want to see what steps HPA is performing while scaling, use this command and check for the events section:
$ kubectl describe deploy hpa-demo-deployment
Name:                   hpa-demo-deployment
Namespace:              default
CreationTimestamp:      Mon, 30 Aug 2021 17:15:34 +0530
Labels:
Annotations:            deployment.kubernetes.io/revision: 1
Selector:               run=php-apache
Replicas:               7 desired | 7 updated | 7 total | 7 available | 0 NewReplicaSet:          hpa-demo-deployment-d4cf67d68 (7/7 replicas created)
...
...
Events:
  Type    Reason             Age    From                   Message
  ----    ------             ----   ----                   -------
  Normal  ScalingReplicaSet  12m    deployment-controller  Scaled up replica set hpa-demo-deployment-d4cf67d68 to 1
  Normal  ScalingReplicaSet  5m39s  deployment-controller  Scaled up replica set hpa-demo-deployment-d4cf67d68 to 4
  Normal  ScalingReplicaSet  5m24s  deployment-controller  Scaled up replica set hpa-demo-deployment-d4cf67d68 to 5
  Normal  ScalingReplicaSet  4m38s  deployment-controller  Scaled up replica set hpa-demo-deployment-d4cf67d68 to 7
We can see that the pods were scaled up from 1 to 4, then to 5, and finally to 7.
Decrease the load
Next, we’ll decrease the load. Navigate to the terminal where you executed the load test and stop the load generation by entering
Then, verify the status of your resource usage:
$ kubectl get hpa
NAME                REFERENCE                       TARGETS  MINPODS MAXPODS REPLICAS  AGE
hpa-demo-deployment  Deployment/hpa-demo-deployment  0%/50%     1       10    1        25m

$ kubectl get deployment hpa-demo-deployment
NAME                  READY   UP-TO-DATE   AVAILABLE       AGE
hpa-demo-deployment    1/1         1            1           25m
Another way to verify the status is:
$ kubectl get events51m Normal SuccessfulCreate replicaset/hpa-demo-deployment-cf6477c46 Created pod: hpa-demo-deployment-cf6477c46-b56vr
52m Normal SuccessfulRescale horizontalpodautoscaler/hpa-demo-deployment New size: 4; reason: cpu resource utilization (percentage of request) above target
52m Normal ScalingReplicaSet deployment/hpa-demo-deployment Scaled up replica set hpa-demo-deployment-cf6477c46 to 4
52m Normal SuccessfulRescale horizontalpodautoscaler/hpa-demo-deployment New size: 6; reason: cpu resource utilization (percentage of request) above target
52m Normal ScalingReplicaSet deployment/hpa-demo-deployment Scaled up replica set hpa-demo-deployment-cf6477c46 to 6
51m Normal SuccessfulRescale horizontalpodautoscaler/hpa-demo-deployment New size: 7; reason: cpu resource utilization (percentage of request) above target
51m Normal ScalingReplicaSet deployment/hpa-demo-deployment Scaled up replica set hpa-demo-deployment-cf6477c46 to 7
53m Normal Scheduled pod/load-generator Successfully assigned default/load-generator to ip-192-168-74-193.us-west-2.compute.internal
53m Normal Pulling pod/load-generator Pulling image "busybox"
52m Normal Pulled pod/load-generator Successfully pulled image "busybox" in 1.223993555s
52m Normal Created pod/load-generator Created container load-generator
52m Normal Started pod/load-generator Started container load-generatorDestroy the cluster
Finally, we’ll destroy the demo EKS cluster with this command:
$ eksctl delete cluster --name my-hpa-demo-cluster --region us-west-2
2021-08-30 20:10:09 [ℹ]  eksctl version 0.60.0
2021-08-30 20:10:09 [ℹ]  using region us-west-2
2021-08-30 20:10:09 [ℹ]  deleting EKS cluster "my-hpa-demo-cluster"
...
...
2021-08-30 20:12:40 [ℹ]  waiting for CloudFormation stack "eksctl-my-hpa-demo-cluster-nodegroup-ng-1"
2021-08-30 20:12:41 [ℹ]  will delete stack "eksctl-my-hpa-demo-cluster-cluster"
2021-08-30 20:12:42 [✔]  all cluster resources were deleted
Usage and cost reporting with HPA
With increased scalability comes increased complexity—horizontal autoscaling complicates usage and cost reporting by introducing variability into the equation. Usage is easier to measure and attribute to each tenant in a Kubernetes cluster when capacity is absolutely static and the cluster has no more than a couple of tenants. However, as you add more tenants and constantly adjust the capacity (as HPA allows us to do), specialized tooling becomes a must-have for allocating costs to tenants.
The open-source Kubecost tool solves this problem by measuring detailed usage by Kubernetes concept, and correlating granular usage data with billing information from your cloud provider or cost estimates from your on-prem environment.
It’s easier to measure usage and calculate costs in a static Kubernetes cluster. It’s much harder to do it when the resources allocated to pods routinely change.
The main Kubecost dashboard shown below summarizes cluster costs, efficiency, and the health of your clusters:
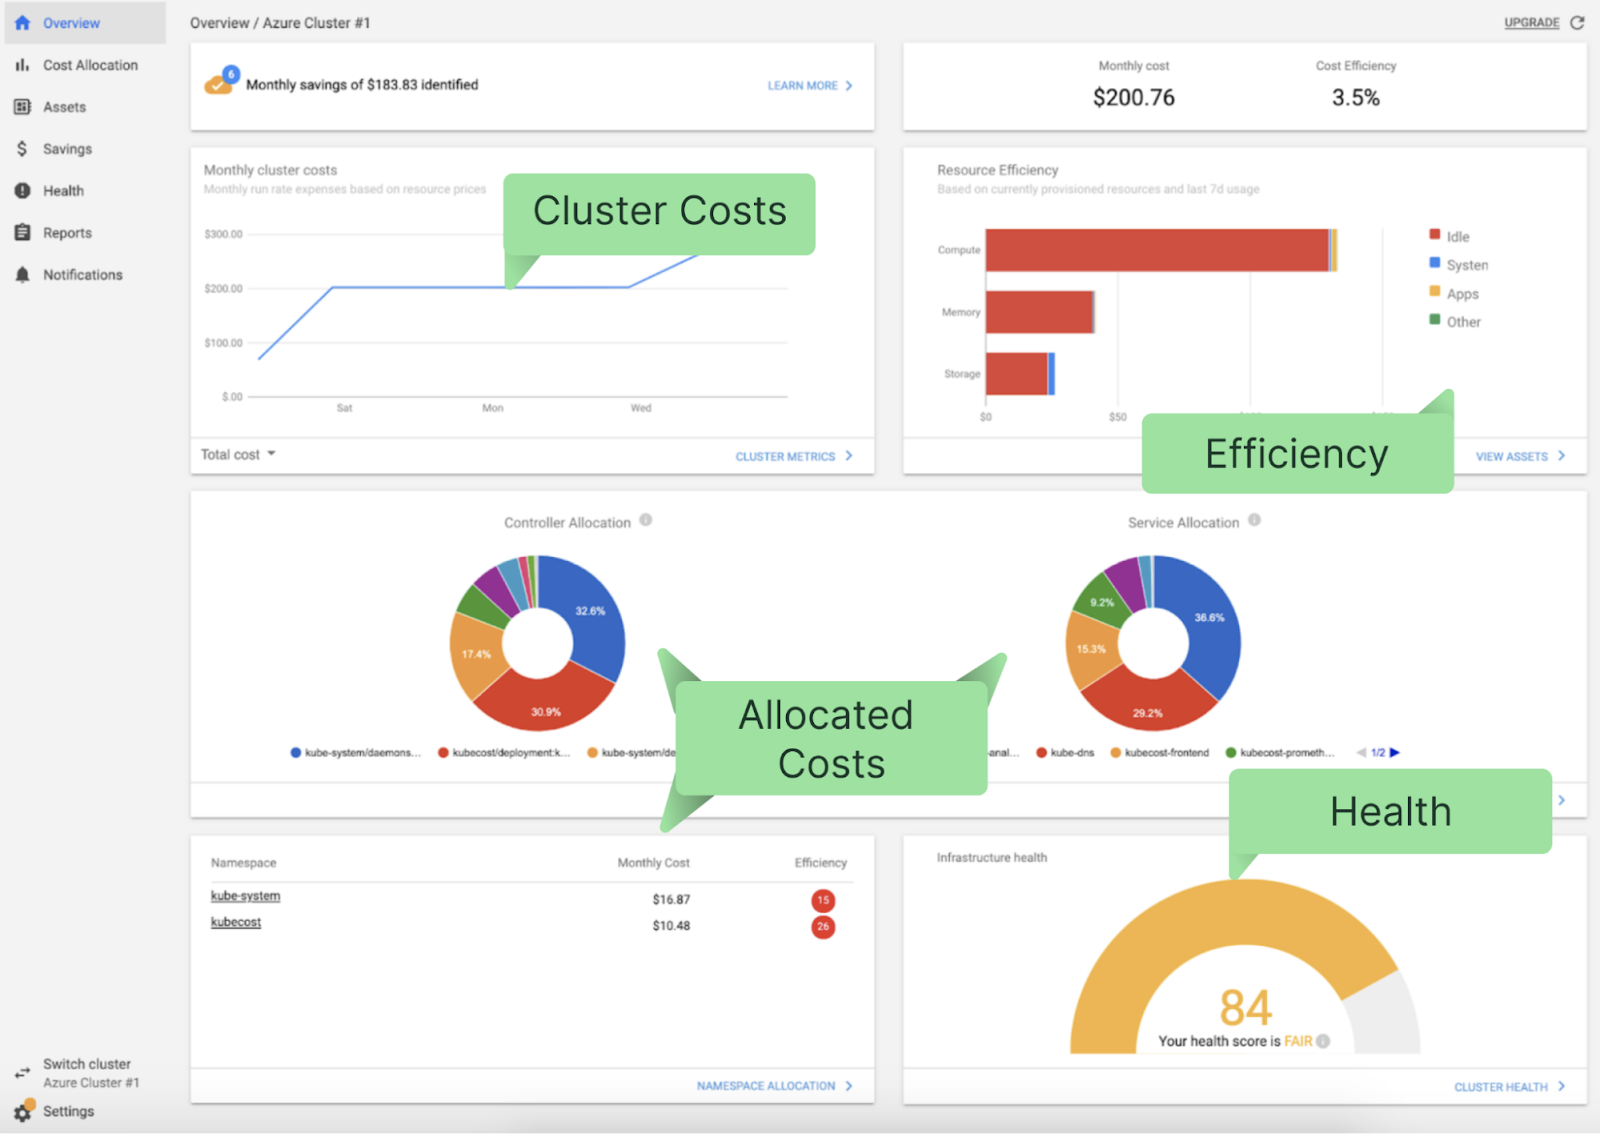
A single Helm command installs Kubecost. You can start here and try it out for free.
Summary
To recap, in this article, we have learned:
- HPA is one of the autoscaling methods native to Kubernetes, used to scale resources like deployments, replica sets, replication controllers, and stateful sets. It increases or reduces the number of pods based on observed metrics and in accordance with given thresholds.
- Each HPA exists in the cluster as a HorizontalPodAutoscaler object. To interact with these objects, you can use commands like “kubectl get hpa” or “kubectl describe hpa HPA_NAME”.
- HPA makes scaling decisions based on resource request values at the container level. Therefore, it is essential to have configured the resource request values for all of your containers.
- The Metrics Server must be installed on the Kubernetes cluster for HPA to work.
- Due to its inherent limitations, HPA works best when combined with Cluster Autoscaler. When the existing nodes on the cluster are exhausted, HPA cannot scale resources up, so it needs Cluster Autoscaler to help add nodes in the Kubernetes cluster.
Learn how to manage K8s costs via the Kubecost APIs