Learn Kubernetes Cluster Autoscaler’s functionality and limitations with examples and understand how to use it with other Kubernetes autoscaling methods.
🎉 Kubecost 2.0 is here! Learn more about the massive new feature additions and predictive learning

Chapter 3:

Kubernetes Cluster Autoscaler

Scalability is one of the core value propositions of Kubernetes (K8s). Alongside Vertical Pod Autoscaler (VPA) and Horizontal Pod Autoscaler (HPA), Cluster Autoscaler (CA) is one of the three autoscaling functionalities in K8s. Therefore, understanding Cluster Autoscaler is an integral part of getting the most out of your Kubernetes platform.

To help you get started with CA, we will provide you with an introduction to Cluster Autoscaler in Kubernetes, describe its usage and benefits, and walk through an example implementing Cluster Autoscaler using AWS Elastic Kubernetes Service (EKS).

Cluster Autoscaler vs. other types of Autoscalers

Before we explore the specifics of CA, let’s review the different types of autoscaling in Kubernetes. They are:

  1. Cluster Autoscaler (CA): adjusts the number of nodes in the cluster when pods fail to schedule or when nodes are underutilized.
  2. Horizontal Pod Autoscaler (HPA): adjusts the number of replicas of an application.
  3. Vertical Pod Autoscaler (VPA): adjusts the resource requests and limits of a container.

A simple way to think about the Kubernetes autoscaling functionality is that HPA and VPA operate at the pod level, whereas CA works at the cluster level.

What is Cluster Autoscaler (CA)

The Cluster Autoscaler automatically adds or removes nodes in a cluster based on resource requests from pods. The Cluster Autoscaler doesn’t directly measure CPU and memory usage values to make a scaling decision. Instead, it checks every 10 seconds to detect any pods in a pending state, suggesting that the scheduler could not assign them to a node due to insufficient cluster capacity.

How Cluster Autoscaler (CA) works

In the scaling-up scenario, CA automatically kicks in when the number of pending (un-schedulable) pods increases due to resource shortages and works to add additional nodes to the cluster.

The Cluster Autoscaler scaling process is visually explained above step by step.

The diagram above illustrates the Cluster Autoscaler decision-making process when there is a need to increase capacity. A similar mechanism exists for the scale-down scenario where CA may consolidate pods onto fewer nodes to free up a node and terminate it.

The four steps involved in scaling up a cluster are as follows:

  1. When Cluster Autoscaler is active, it will check for pending pods. The default scan interval is 10 seconds, which is configurable using the --scan-interval flag.
  2. If there are any pending pods and the cluster needs more resources, CA will extend the cluster by launching a new node as long as it is within the constraints configured by the administrator (more on this in our example). Public cloud providers like AWS, Azure, GCP also support the Kubernetes Cluster Autoscaler functionality. For example, AWS EKS integrates into Kubernetes using its AWS Auto Scaling group functionality to automatically add and remove EC2 virtual machines that serve as cluster nodes.
  3. Kubernetes registers the newly provisioned node with the control plane to make it available to the Kubernetes scheduler for assigning pods.
  4. Finally, the Kubernetes scheduler allocates the pending pods to the new node.

Limitations of CA

Cluster Autoscaler has a couple of limitations worth keeping in mind when planning your implementation:

  • CA does not make scaling decisions using CPU or memory usage. It only checks a pod’s requests and limits for CPU and memory resources. This limitation means that the unused computing resources requested by users will not be detected by CA, resulting in a cluster with waste and low utilization efficiency.
  • Whenever there is a request to scale up the cluster, CA issues a scale-up request to a cloud provider within 30–60 seconds. The actual time the cloud provider takes to create a node can be several minutes or more. This delay means that your application performance may be degraded while waiting for the extended cluster capacity.

EKS Example: How to implement Cluster Autoscaler

Next, we’ll follow step-by-step instructions to implement the Kubernetes CA functionality in AWS Elastic Kubernetes Service (EKS). EKS uses the AWS Auto Scaling group (which we’ll occasionally refer to as “ASG”) functionality to integrate with CA and execute its requests for adding and removing nodes. Below are the seven steps that we will step through as part of this exercise.

  1. Review the prerequisites for Cluster Autoscaler
  2. Create an EKS cluster in AWS
  3. Create IAM OIDC provider
  4. Create IAM policy for Cluster Autoscaler
  5. Create IAM role for Cluster Autoscaler
  6. Deploy Kubernetes Cluster Autoscaler
  7. Create an Nginx deployment to test the CA functionality

Prerequisites

The screenshot below shows the tags associated with the Auto Scaling group. CA relies on these labels to identify the AWS Auto Scaling groups intended for its use. If those labels are not present, CA will not discover the Auto Scaling group and won’t add/remove the nodes from the EKS cluster.

Tags (in the form of key-value pairs) assigned to our autoscaling group.

STEP 1: Create an EKS cluster

This walkthrough will create an EKS cluster in AWS with two Auto Scaling groups to demonstrate how Cluster Autoscaler uses the autoscaling group to manage the EKS cluster. When creating the EKS cluster, AWS automatically creates the EC2 Auto Scaling groups, but you must ensure that they contain the labels required by Cluster Autoscaler to discover them.

First, create an EKS cluster configuration file using the content shown below:

---
apiVersion: eksctl.io/v1alpha5
kind: ClusterConfig
metadata:
  name: demo-ca-cluster
  region: us-east-1
  version: "1.20"
availabilityZones:
- us-east-1a
- us-east-1b
managedNodeGroups:
- name: managed-nodes
  labels:
    role: managed-nodes
  instanceType: t3.medium
  minSize: 1
  maxSize: 10
  desiredCapacity: 1
  volumeSize: 20
nodeGroups:
- name: unmanaged-nodes
  labels:
    role: unmanaged-nodes
  instanceType: t3.medium
  minSize: 1
  maxSize: 10
  desiredCapacity: 1
  volumeSize: 20

Here, we are creating two Auto Scaling groups for the cluster (behind the scenes, AWS EKS uses node groups to simplify the node’s lifecycle management):

  1. Managed-nodes
  2. Unmanaged-nodes

We will use the unmanaged nodes later in this exercise as part of a test to verify the proper functioning of the Cluster Autoscaler.

Next, use eksctl to create the EKS cluster using the command shown below.

$ eksctl create cluster -f eks.yaml

STEP 2: Verification of the EKS cluster and AWS Auto Scaling groups

We can verify using the kubectl command line:

$ kubectl get svc
NAME         TYPE        CLUSTER-IP   EXTERNAL-IP   PORT(S)   AGE
kubernetes   ClusterIP   10.100.0.1           443/TCP   14m

We can also verify the presence of our cluster via the AWS console:

Our cluster, as displayed in the AWS Console

We can certify that the Auto Scaling groups are provisioned in the AWS console:

Our Auto Scaling groups in the AWS Console

Comprehensive Kubernetes cost monitoring & optimization

STEP 3: Create IAM OIDC provider

IAM OIDC is used for authorizing the Cluster Autoscaler to launch or terminate instances under an Auto Scaling group. In this section, we will see how to configure it with the EKS cluster.

In the EKS cluster console, navigate to the configuration tab and copy the OpenID connect URL, as shown below:

The OpenID we need to copy from the AWS console.

Then, go to the IAM console, and select Identity provider as shown below:

Selecting an identity provider in the AWS Console.

Click “Add provider,” select “OpenID Connect,” and click “Get thumbprint” as shown below:

Selecting OpenID and getting the thumbprint of a provider in the AWS Console.

Then enter the “Audience” (sts.amazonaws.com in our example pointing to the AWS STS, also known as the Security Token Service) and add the provider (learn more about OpenID here).

Adding the provider in the AWS Console.

Note: You will need to attach the IAM role to use this provider—we’ll review that next.

Adding the identity information in the AWS Console.

STEP 4: Create IAM policy

Next, we need to create the IAM policy, which allows CA to increase or decrease the number of nodes in the cluster.

To create the policy with the necessary permissions, save the below file as “AmazonEKSClusterAutoscalerPolicy.json” or any name you want:

{
  "Version": "2012-10-17",
  "Statement": [
      {
          "Action": [
              "autoscaling:DescribeAutoScalingGroups",
              "autoscaling:DescribeAutoScalingInstances",
              "autoscaling:DescribeLaunchConfigurations",
              "autoscaling:DescribeTags",
              "autoscaling:SetDesiredCapacity",
              "autoscaling:TerminateInstanceInAutoScalingGroup",
              "ec2:DescribeLaunchTemplateVersions"
          ],
          "Resource": "*",
          "Effect": "Allow"
      }
  ]
}

Then, create the policy by running the following AWS CLI command (learn more about installing and configuring AWS CLI here):

$ aws iam create-policy --policy-name AmazonEKSClusterAutoscalerPolicy --policy-document file://AmazonEKSClusterAutoscalerPolicy.json

Verification of the policy:

$ aws iam list-policies --max-items 1
{
    "NextToken": "eyJNYXJrZXIiOiBudWxsLCAiYm90b190cnVuY2F0ZV9hbW91bnQiOiAxfQ==",
    "Policies": [
        {
            "PolicyName": "AmazonEKSClusterAutoscalerPolicy",
            "PermissionsBoundaryUsageCount": 0,
            "CreateDate": "2021-10-24T15:02:46Z",
            "AttachmentCount": 0,
            "IsAttachable": true,
            "PolicyId": "ANPA4KZ4K7F2VD6DQVAZT",
            "DefaultVersionId": "v1",
            "Path": "/",
            "Arn": "arn:aws:iam::847845718389:policy/AmazonEKSClusterAutoscalerPolicy",
            "UpdateDate": "2021-10-24T15:02:46Z"
        }
    ]
}

STEP 5: Create an IAM role for the provider

As discussed earlier, we still need to create an IAM role and link it to the provider we created in Step 3.

Selecting a web identity and provider.

Select the Audience “sts.amazonaws.com” and attach the policy which you have created.

Then, verify the IAM role and make sure the policy is attached.

IAM role and policy in the AWS Console.

Edit the “Trust relationships.”

Editing “Trust relationships”.

Next, change the OIDC as shown below:

Changing the OIDC to edit a trust relationship.

Then click “Update Trust Policy” to save it.

Kubecost + StormForge = Automated K8s Cost Optimization

STEP 6: Deploy Cluster Autoscaler

Next, we deploy Cluster Autoscaler. To do so, you must use the Amazon Resource Names (ARN) number of the IAM role created in our earlier step.

To deploy CA, save the following content presented after the command below in a file and run this provided command:

$ kubectl  apply -f <path of the file> 

The content intended to save into a file (make sure you copy all of the content presented over the next page):

apiVersion: v1
kind: ServiceAccount
metadata:
  labels:
    k8s-addon: cluster-autoscaler.addons.k8s.io
    k8s-app: cluster-autoscaler
  annotations:
    eks.amazonaws.com/role-arn: arn:aws:iam::847845718389:role/AmazonEKSClusterAutoscalerRole
  name: cluster-autoscaler
  namespace: kube-system

---
apiVersion: rbac.authorization.k8s.io/v1
kind: ClusterRole
metadata:
  name: cluster-autoscaler
  labels:
    k8s-addon: cluster-autoscaler.addons.k8s.io
    k8s-app: cluster-autoscaler
rules:
  - apiGroups: [""]
    resources: ["events", "endpoints"]
    verbs: ["create", "patch"]
  - apiGroups: [""]
    resources: ["pods/eviction"]
    verbs: ["create"]
  - apiGroups: [""]
    resources: ["pods/status"]
    verbs: ["update"]
  - apiGroups: [""]
    resources: ["endpoints"]
    resourceNames: ["cluster-autoscaler"]
    verbs: ["get", "update"]
  - apiGroups: [""]
    resources: ["nodes"]
    verbs: ["watch", "list", "get", "update"]
  - apiGroups: [""]
    resources:
      - "pods"
      - "services"
      - "replicationcontrollers"
      - "persistentvolumeclaims"
      - "persistentvolumes"
    verbs: ["watch", "list", "get"]
  - apiGroups: ["extensions"]
    resources: ["replicasets", "daemonsets"]
    verbs: ["watch", "list", "get"]
  - apiGroups: ["policy"]
    resources: ["poddisruptionbudgets"]
    verbs: ["watch", "list"]
  - apiGroups: ["apps"]
    resources: ["statefulsets", "replicasets", "daemonsets"]
    verbs: ["watch", "list", "get"]
  - apiGroups: ["storage.k8s.io"]
    resources: ["storageclasses", "csinodes"]
    verbs: ["watch", "list", "get"]
  - apiGroups: ["batch", "extensions"]
    resources: ["jobs"]
    verbs: ["get", "list", "watch", "patch"]
  - apiGroups: ["coordination.k8s.io"]
    resources: ["leases"]
    verbs: ["create"]
  - apiGroups: ["coordination.k8s.io"]
    resourceNames: ["cluster-autoscaler"]
    resources: ["leases"]
    verbs: ["get", "update"]
---
apiVersion: rbac.authorization.k8s.io/v1
kind: Role
metadata:
  name: cluster-autoscaler
  namespace: kube-system
  labels:
    k8s-addon: cluster-autoscaler.addons.k8s.io
    k8s-app: cluster-autoscaler
rules:
  - apiGroups: [""]
    resources: ["configmaps"]
    verbs: ["create","list","watch"]
  - apiGroups: [""]
    resources: ["configmaps"]
    resourceNames: ["cluster-autoscaler-status", "cluster-autoscaler-priority-expander"]
    verbs: ["delete", "get", "update", "watch"]

---
apiVersion: rbac.authorization.k8s.io/v1
kind: ClusterRoleBinding
metadata:
  name: cluster-autoscaler
  labels:
    k8s-addon: cluster-autoscaler.addons.k8s.io
    k8s-app: cluster-autoscaler
roleRef:
  apiGroup: rbac.authorization.k8s.io
  kind: ClusterRole
  name: cluster-autoscaler
subjects:
  - kind: ServiceAccount
    name: cluster-autoscaler
    namespace: kube-system


---
apiVersion: rbac.authorization.k8s.io/v1
kind: RoleBinding
metadata:
  name: cluster-autoscaler
  namespace: kube-system
  labels:
    k8s-addon: cluster-autoscaler.addons.k8s.io
    k8s-app: cluster-autoscaler
roleRef:
  apiGroup: rbac.authorization.k8s.io
  kind: Role
  name: cluster-autoscaler
subjects:
  - kind: ServiceAccount
    name: cluster-autoscaler
    namespace: kube-system

---
apiVersion: apps/v1
kind: Deployment
metadata:
  name: cluster-autoscaler
  namespace: kube-system
  labels:
    app: cluster-autoscaler
spec:
  replicas: 1
  selector:
    matchLabels:
      app: cluster-autoscaler
  template:
    metadata:
      labels:
        app: cluster-autoscaler
      annotations:
        cluster-autoscaler.kubernetes.io/safe-to-evict: 'false'
    spec:
      serviceAccountName: cluster-autoscaler
      containers:
        - image: k8s.gcr.io/autoscaling/cluster-autoscaler:v1.20.0
          name: cluster-autoscaler
          resources:
            limits:
              cpu: 100m
              memory: 500Mi
            requests:
              cpu: 100m
              memory: 500Mi
          command:
            - ./cluster-autoscaler
            - --v=4
            - --stderrthreshold=info
            - --cloud-provider=aws
            - --skip-nodes-with-local-storage=false
            - --expander=least-waste
            - --node-group-auto-discovery=asg:tag=k8s.io/cluster-autoscaler/enabled,k8s.io/cluster-autoscaler/demo-ca-cluster
            - --balance-similar-node-groups
            - --skip-nodes-with-system-pods=false
          volumeMounts:
            - name: ssl-certs
              mountPath: /etc/ssl/certs/ca-certificates.crt #/etc/ssl/certs/ca-bundle.crt for Amazon Linux Worker Nodes
              readOnly: true
          imagePullPolicy: "Always"
      volumes:
        - name: ssl-certs
          hostPath:
            path: "/etc/ssl/certs/ca-bundle.crt"

For this step, the crucial parameters are:

  • --node-group-auto-discovery = This is used by CA to discover the Auto Scaling group based on its tag. Here is an example to illustrate the tag format: asg:tag=tagKey,anotherTagKey
  • V1.20.0 = This is the release version of the EKS cluster used in our example. You must update if you are running an older version.
  • --balance-similar-node = If you set the flag to “true,” CA will detect similar node groups and balance the number of nodes between them.
  • --skip-nodes-with-system-pods = If you set this flag to “true,” CA will never delete nodes that host a pod associated with the kube-system (except for DaemonSet or mirror pods).

Refer to this filefor a complete set of cluster configuration parameters for your future use.

Next, verify that you are using the correct kubeconfig:

$ kubectx
bob@demo-ca-cluster.us-east-1.eksctl.io

Then apply the changes by issuing the command shown below using the YAML configuration file created earlier in this step using the provided content:

Next, verify the logs by issuing this command:

$ kubectl logs -l app=cluster-autoscaler -n kubesystem -f

The sections below highlighted in red indicate that the command ran successfully.

CA will now check for unscheduled pods and try to schedule them. You can see those actions from the logs. Check the status of the pods by issuing the following command:

$ kubectl get pods -n kube-system

The expected results are displayed below.

Check the number of nodes in the EKS cluster:

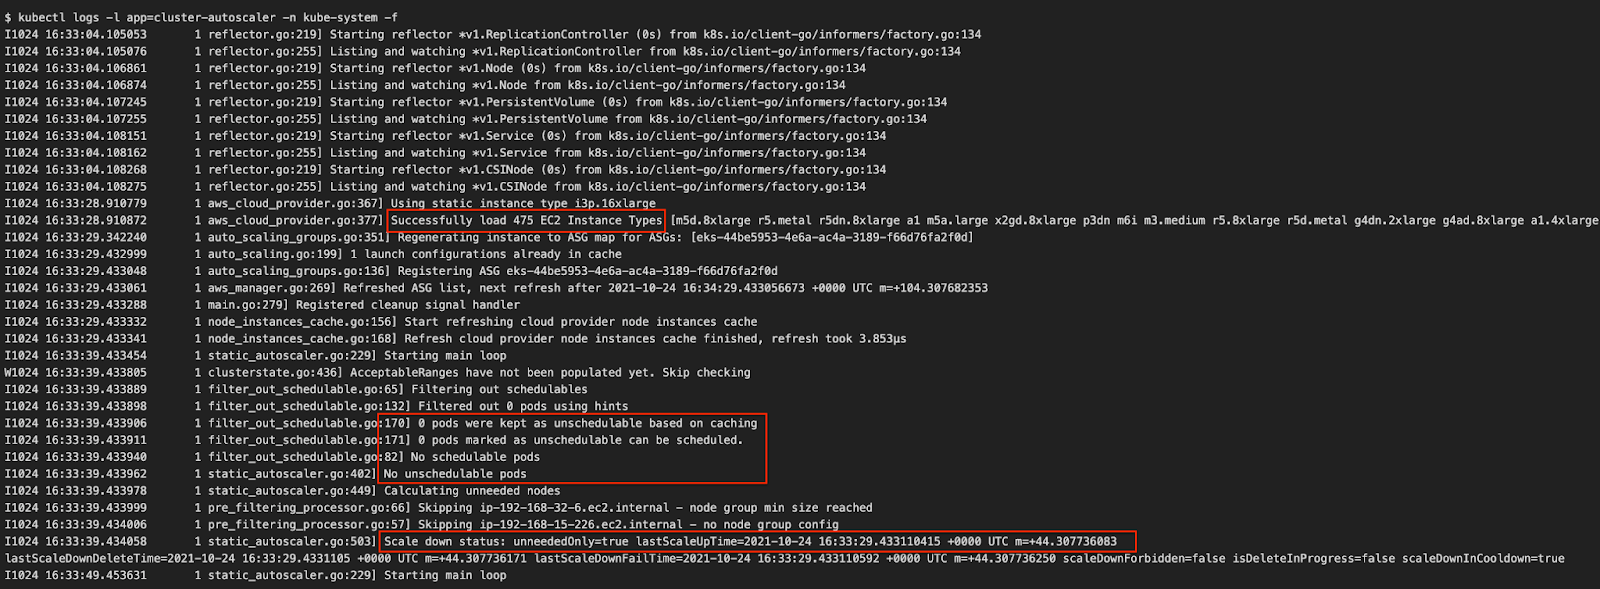
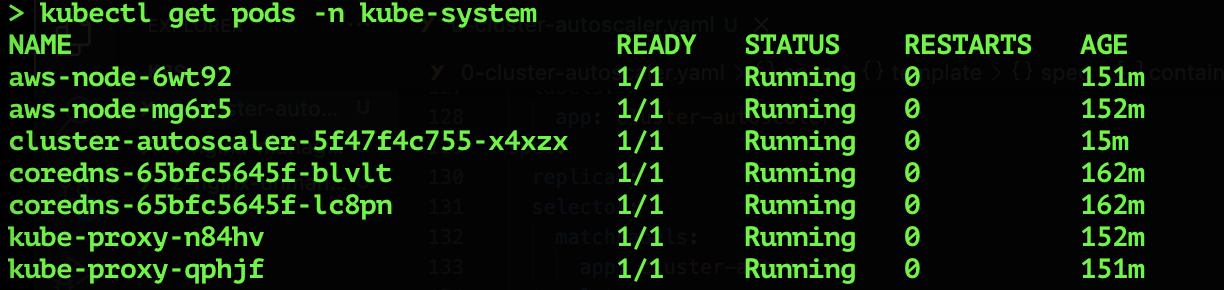
Congratulations! You have deployed the Cluster Autoscaler successfully.

Here, you see two nodes in the cluster where one node is under a managed group and another under an unmanaged group. This configuration allows us to test the Cluster Autoscaler functionality later in our exercise. Next, we will deploy Nginx as a sample application deployment to exercise autoscaling and observe CA’s actions.

STEP 7: Create an Nginx deployment to test autoscaler functionality

We are going to create two deployments: one for the managed node group, and another deployment for the unmanaged node group.

Manage node group deployment:

Create a configuration file based on the content below:

apiVersion: apps/v1
kind: Deployment
metadata:
  name: nginx-managed
  namespace: default
spec:
  replicas: 2
  selector:
    matchLabels:
      app: nginx-managed
  template:
    metadata:
      labels:
        app: nginx-managed
    spec:
      containers:
      - name: nginx-managed
        image: nginx:1.14.2
        ports:
        - containerPort: 80
      affinity:
        nodeAffinity:
          requiredDuringSchedulingIgnoredDuringExecution:
            nodeSelectorTerms:
            - matchExpressions:
              - key: role
                operator: In
                values:
                - managed-nodes
        podAntiAffinity:
          requiredDuringSchedulingIgnoredDuringExecution:
          - labelSelector:
              matchExpressions:
              - key: app
                operator: In
                values:
                - nginx-managed
            topologyKey: kubernetes.io/hostname
            namespaces:
            - default

Note: The above configurations make use of nodeAffinity to select the node group with the label “role=managed-nodes” to help control where the scheduler provisions the pods.

Apply the changes:

$ kubectl apply -f 1-nginx-managed.yaml
deployment.apps/nginx-managed created

Unmanaged Node group Deployment:

For the unmanaged node group, create a configuration file using the content below

apiVersion: apps/v1
kind: Deployment
metadata:
  name: nginx-unmanaged
  namespace: default
spec:  replicas: 2
  selector:
    matchLabels:
      app: nginx-unmanaged
  template:
    metadata:
      labels:
        app: nginx-unmanaged
    spec:
      containers:
      - name: nginx-unmanaged
        image: nginx:1.14.2
        ports:
        - containerPort: 80
      affinity:
        nodeAffinity:
          requiredDuringSchedulingIgnoredDuringExecution:
            nodeSelectorTerms:
            - matchExpressions:
              - key: role
                operator: In
                values:
                - unmanaged-nodes
        podAntiAffinity:
          requiredDuringSchedulingIgnoredDuringExecution:
          - labelSelector:
              matchExpressions:
              - key: app
                operator: In
                values:
                - nginx-unmanaged
            topologyKey: kubernetes.io/hostname
            namespaces:
            - default

Apply the changes

$ kubectl apply -f 2-nginx-unmanaged.yaml
deployment.apps/nginx-unmanaged created

Check the status of the pods.

$ kubectl get pods -n default
NAME                               READY   STATUS    RESTARTS   AGE
nginx-managed-7cf8b6449c-mctsg     1/1     Running   0          60s
nginx-managed-7cf8b6449c-vjvxf     0/1     Pending   0          60s
nginx-unmanaged-67dcfb44c9-gvjg4   0/1     Pending   0          52s
nginx-unmanaged-67dcfb44c9-wqnvr   1/1     Running   0          52s

Now, you can see two of the four pods are running because we have only two nodes in the cluster. Please note that we have used a pod AntiAffinity configuration to prevent Kubernetes from provisioning multiple pods of this deployment on the same node (thereby avoiding the need for the additional capacity required to demonstrate CA’s functionality).

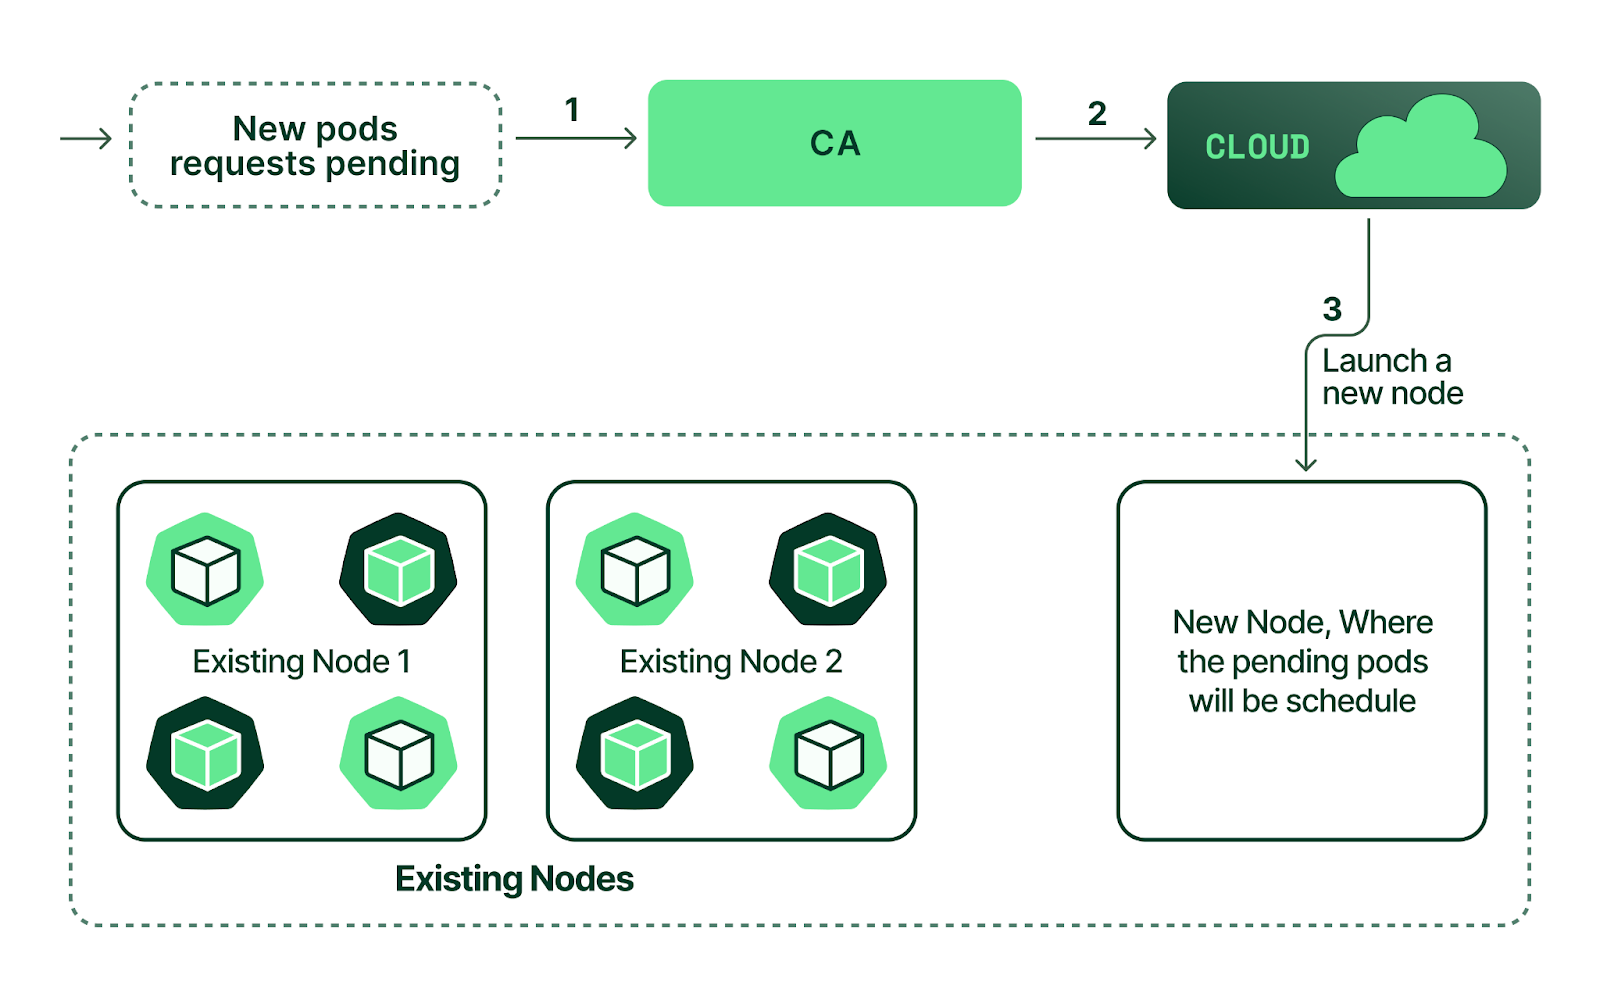
The Cluster Autoscaler will check the state of the pods, discover that some are in a “pending” state, and try to provision new nodes in the cluster. In a few minutes, you will see a third node provisioned.

One pod is still in a pending state because we did not add the label when we created the EKS cluster with managed/unmanaged node groups. If the label is not present in the Auto Scaling group, then the Cluster Autoscaler will not discover the Auto Scaling group to scale the cluster.

K8s clusters handling 10B daily API calls use Kubecost

List the Auto Scaling groups based on tags

The below AWS CLI commands show the Auto Scaling group that is labeled and therefore discovered. You can see in the results shown below that there is only one Auto Scaling group (managed).

$ aws autoscaling describe-auto-scaling-groups --query "AutoScalingGroups[? Tags[? (Key=='k8s.io/cluster-autoscaler/enabled') && Value=='true']]".AutoScalingGroupName --region us-east-1
[
    "eks-44be5953-4e6a-ac4a-3189-f66d76fa2f0d"
]

$ aws autoscaling describe-auto-scaling-groups --query "AutoScalingGroups[? Tags[? (Key=='k8s.io/cluster-autoscaler/demo-ca-cluster') && Value=='owned']]".AutoScalingGroupName --region us-east-1
[
    "eks-44be5953-4e6a-ac4a-3189-f66d76fa2f0d"
]

Add the labels

Now, let’s add the label manually to the unmanaged Auto Scaling group created earlier from the AWS console.

Adding labels to Auto Scaling groups in the AWS Console.

At this point, both the managed and unmanaged node groups contain the required label.

$ aws autoscaling describe-auto-scaling-groups --query "AutoScalingGroups[? Tags[? (Key=='k8s.io/cluster-autoscaler/enabled') && Value=='true']]".AutoScalingGroupName --region us-east-1
[
    "eks-44be5953-4e6a-ac4a-3189-f66d76fa2f0d",
 "eksctl-demo-ca-cluster-nodegroup-unmanaged-nodes-NodeGroup-187AQL8VGA6WA"
]

$ aws autoscaling describe-auto-scaling-groups --query "AutoScalingGroups[? Tags[? (Key=='k8s.io/cluster-autoscaler/demo-ca-cluster') && Value=='owned']]".AutoScalingGroupName --region us-east-1
[
    "eks-44be5953-4e6a-ac4a-3189-f66d76fa2f0d",
 "eksctl-demo-ca-cluster-nodegroup-unmanaged-nodes-NodeGroup-187AQL8VGA6WA"
]

Verification of the pods

Let’s check again the node status to verify how our most recent configuration change affected the way CA provisions nodes in our cluster. Below you can see that a fourth node was added to the cluster.

When you check the pod status, all four pods will be running since we have four nodes in the cluster.

If you check the Auto Scaling group from the AWS Console, you can verify that the four nodes have been indeed provisioned.

An example of what your Auto Scaling groups should look like.

Scale down the nodes

We can also verify that Cluster Autoscaler can remove nodes. To do so, we delete the Nginx deployments (pods) and observe how CA responds by removing nodes from the cluster to accommodate the reduced capacity requirement. We delete the deployments by issuing the kubectl commands below:

$ kubectl delete -f 1-Nginx-managed.yaml
deployment.apps "nginx-managed" deleted

$ kubectl delete -f 2-nginx-unmanaged.yaml
deployment.apps "nginx-unmanaged" deleted

After you delete the deployment, wait for a few minutes and then check the Auto Scaling group in the AWS console to verify the desired node reduction.

Checking the Auto Scaling groups.

Cleaning up after the tutorial

Remember to delete the EKS cluster used in this exercise once you have completed testing by using the following command:

$ eksctl delete cluster --name=demo-ca-cluster --region us-east-1
2021-10-25 00:45:38 [ℹ]  eksctl version 0.60.0
2021-10-25 00:45:38 [ℹ]  using region us-east-1
2021-10-25 00:45:38 [ℹ]  deleting EKS cluster "demo-ca-cluster"
...
...
2021-10-25 00:49:24 [ℹ]  will delete stack "eksctl-demo-ca-cluster-cluster"
2021-10-25 00:49:24 [✔]  all cluster resources were deleted

Usage and cost reporting with Cluster Autoscaler

With scale and automation comes increased monitoring complexity—measuring usage and allocating costs become more complicated as Cluster Autoscaler changes the resources within your cluster by adding or deleting nodes.

Kubecost was conceived as an open-source project to address this challenge by automatically measuring resource usage even as the underlying cluster capacity constantly changes due to autoscaling. Kubecost measures CPU, memory, GPU, network, and disk usage and integrates with the cost data provided by cloud providers (or the node costs estimated in a data center) to determine the cost of each resource and allocate it by Kubernetes concepts such as label and namespace. Kubecost can also alert when the costs jump unexpectedly, measure the cluster’s utilization efficiency, and determine the cluster’s overall health by using pre-configured policies based on industry best practices.

You can start by viewing a cluster’s costs, efficiency, and health in the main dashboard, as shown in the screenshot below, and drill down to see more details:

Metrics on the Kubecost dashboard.

Remember to read our guide on Kubernetes labels to learn the best practices for implementing a labeling policy to enhance your Kubecost cost allocation reports. You can install Kubecost with a single line of code via Helm chart here. Kubecost is free forever for a single cluster of any size.

Conclusion

Cluster Autoscaler plays a vital role in a Kubernetes cluster by ensuring adequate computing resources are available by adding nodes to a cluster and keeping infrastructure costs down by removing nodes. CA performs these vital functions by checking for pods in a pending state (which tells CA it needs to add capacity by scaling up) and detecting underutilized nodes (telling CA to scale down). CA is simpler to implement and maintain than VPA and HPA, but that doesn’t mean it should replace them. Kubernetes autoscaling works best with all three autoscaling vectors working in concert. The choice to use CA depends on your application’s architecture (e.g., whether your application is based on microservices or not) and scaling frequency. Therefore, we recommend you use our guide to understand each type of autoscaling supported in Kubernetes and choose the autoscalers that meet your needs.

Learn how to manage K8s costs via the Kubecost APIs

Continue reading this series